Available with Standard or Advanced license.
This workflow describes the steps for splitting parent parcel geometry using construction lines in a parcel fabric enabled with the Local Government Information Model (LGIM). Use this workflow on your own data.
The workflow is similar to the Parcel Split: Metes and Bounds workflow, but instead uses construction lines to split the geometry of an existing, parent parcel and build new parcels. Construction lines are traversed between the points of the existing parcel instead of a new, closed-loop parcel traverse being entered.
This workflow is also available as an automated workflow. To use the Parcel Split: Parent Parcel automated workflow, open the Parcel Workflows dialog box by clicking Parcel Editor > Parcel Workflows. Select Parcel Split: Parent Parcel and click Begin workflow. Automated parcel editing workflows are available when you enable the Local Government Information Model on your parcel fabric.
The workflow consists of the components shown in the diagram below:

Legal description
A legal description for a parcel split using construction lines may look like this:
The northeast corner of parcel 19-21-301-029 described as; beginning in the northeast corner, S 20-27-03 W 150 FT along ROW, TH N 75-09-00 W 108.22 FT, TH N 87-02-15 W 63.019 FT, TH N 13-22-40 W 127.946, TH S 86-34-44 E 250 FT to POB.
Search for parent parcel
- Open a map document that contains your parcel fabric (enabled with the Local Government Information Model).
- In the Table Of Contents window, make only the Tax Parcels layer selectable.
- Make the Lines layer visible.
- Search for the parent parcel or parcels that will be used for the split.
Select parent parcel
- Start an edit session and use the Select Parcel Features tool
 located on the Parcel Editing toolbar to select the parcels that will be used for the split.
Construct and build new parcels
The geometry of the selected parent parcels will be used to build new parcels.
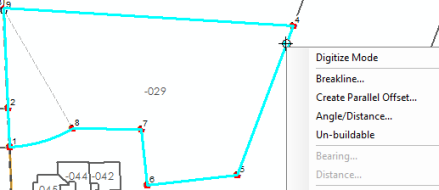
- Right-click the selected parcels and click Construct From Parent.
- Right-click the boundary of the parcel and click Breakline.
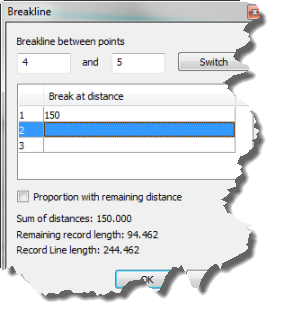
- On the Breakline dialog box, make sure the breakline is going in the right direction. Click Switch to change the direction of the breakline.
- Click the first field under Break at distance and type a Break at distance value for the construction point.
- Use the Breakline tool to create any remaining construction points that will be used to split the parcels.
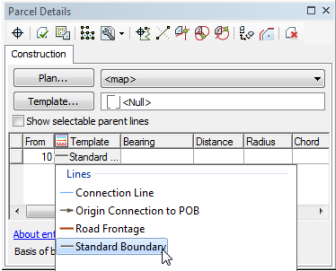
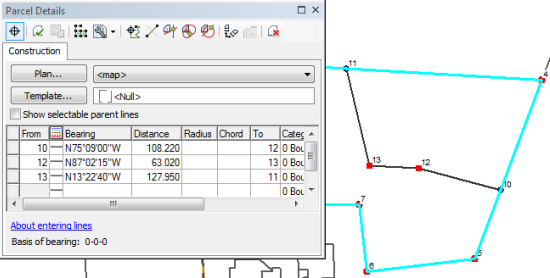
- Click a construction point to add it as the first from point in the Construction grid on the Parcel Details dialog box.
- Click under the Template field and choose the Standard Boundary line template.
The template field name is initially collapsed to a single icon. You can expand the field to display the field name, which is Template.
- Click the Bearing field and type a bearing.
- Press ENTER to move to the Distance field and type a distance. Press ENTER to move to the next row in the Lines grid.
- Continue entering traverse lines until you have created all your parcel split lines.
- Click Template to open the Select Feature Template dialog box and choose the a feature template for the new split parcels.
- Click the Build Parcels
 arrow on the Parcel Details dialog box and choose Build and mark Historic.
 The original parent parcel is saved as historic and new parcels are built from the construction lines. New parcels are named <New parcel> by default.
Data entry in the lines traverse grid is designed to work with the 10-key pad, where you can use a single hand to enter dimensions. Use quadrant-bearing shortcuts and press the ENTER key and ARROW keys to move between cells.
Annotate parcels
- Add the ParcelDimensions annotation feature class to the map.
The ParcelDimensions annotation feature class is created when the Local Government Information Model is enabled on the parcel fabric. The annotation feature class is feature linked to the parcel fabric Lines feature class.
Annotation is created using the Annotate Parcel Courses tool
 , which handles the duplication of annotation on parcel lines.
 - With the new parcel selected, click the Annotate Parcel Courses tool
 on the Parcel Editor toolbar.
 - Select ParcelDimensions on the Annotate Selected Features dialog box and click OK.
Click Yes to re-create annotation.
- If necessary, use the Edit Annotation tool
 to edit and change the placement of the generated annotation.
Attribute parcels
The final step in the workflow is to update the attributes of the new parcels:
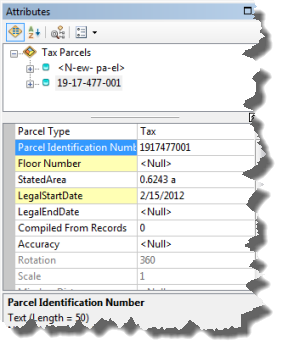
- With the new parcels selected, open the Attributes window.
- Select a parcel from the parcel list under Tax Parcels and update attributes such as the Parcel Identification Number, StatedArea, LegalStartDate, and Accuracy.
The LegalStartDate attribute should correspond to the date on the parcel's plan. If the Accuracy attribute is left empty, the value is inherited internally from the plan accuracy. You can override the plan accuracy by specifying a different parcel accuracy. Accuracy values are used in the parcel fabric least-squares adjustment.
- Update the attributes of the next parcel in the list.
- Optionally update the attributes of the historic parcels:
- Turn on the Historic Parcels layer in the Table Of Contents window.
- Use the selection chip to select the historic parcel in the map.
- Open the Parcel Details dialog box and update attributes such as LegalStartDate, LegalEndDate, and Reason Parcel Retired.
