Summary
Calculates a nearest neighbor index based on the average distance from each feature to its nearest neighboring feature.
Learn more about how Average Nearest Neighbor Distance works
Illustration

Usage
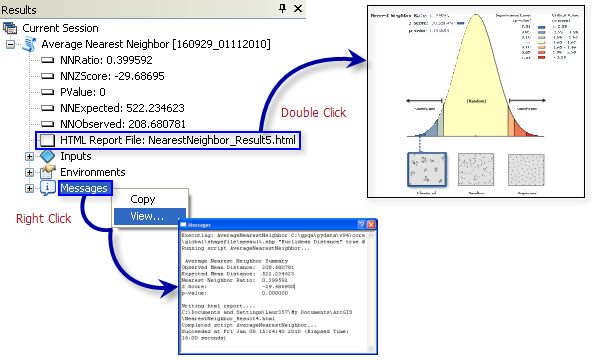
The Average Nearest Neighbor tool returns five values: Observed Mean Distance, Expected Mean Distance, Nearest Neighbor Index, z-score, and p-value. These values are accessible from the Results window and are also passed as derived output values for potential use in models or scripts. Optionally, this tool will create an HTML file with a graphical summary of results. Double-clicking on the HTML entry in the Results window will open the HTML file in the default Internet browser. Right-clicking on the Messages entry in the Results window and selecting View will display the results in a Message dialog box.

The z-score and p-value results are measures of statistical significance which tell you whether or not to reject the null hypothesis. Note, however, that the statistical significance for this method is strongly impacted by study area size (see below). For the Average Nearest Neighbor statistic, the null hypothesis states that features are randomly distributed.
The Nearest Neighbor Index is expressed as the ratio of the Observed Mean Distance to the Expected Mean Distance. The expected distance is the average distance between neighbors in a hypothetical random distribution. If the index is less than 1, the pattern exhibits clustering; if the index is greater than 1, the trend is toward dispersion or competition.
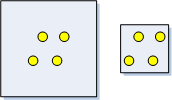
The average nearest neighbor method is very sensitive to the Area value (small changes in the Area parameter value can result in considerable changes in the z-score and p-value results). Consequently, the Average Nearest Neighbor tool is most effective for comparing different features in a fixed study area. The picture below is a classic example of how identical feature distributions can be dispersed or clustered depending on the study area specified.

If an Area parameter value is not specified, then the area of the minimum enclosing rectangle around the input features is used. Unlike the extent, a minimum enclosing rectangle will not necessarily align with the x- and y-axes.
When the Input Feature Class is not projected (that is, when coordinates are given in degrees, minutes, and seconds) or when the output coordinate system is set to a Geographic Coordinate System, distances are computed using chordal measurements. Chordal distance measurements are used because they can be computed quickly and provide very good estimates of true geodesic distances, at least for points within about thirty degrees of each other. Chordal distances are based on an oblate spheroid. Given any two points on the earth's surface, the chordal distance between them is the length of a line, passing through the three-dimensional earth, to connect those two points. Chordal distances are reported in meters.
When chordal distances are used in the analysis, the Area parameter, if specified, should be given in meters.
Prior to ArcGIS 10.2.1, you would see a warning message if the parameters and environment settings you selected would result in calculations being performed using Geographic Coordinates (degrees, minutes, seconds). This warning advised you to project your data into a Projected Coordinate System so that distance calculations would be accurate. Beginning at 10.2.1, however, this tool calculates chordal distances whenever Geographic Coordinate System calculations are required.
There are special cases of input features that would result in invalid (zero-area) minimum enclosing rectangles. In these cases, a small value derived from the input feature XY tolerance will be used to create the minimum enclosing rectangle. For example, if all features are coincident (that is, all have the exact same X and Y coordinates), the area for a very small square polygon around the single location will be used in calculations. Another example would be if all features align perfectly (for example, 3 points in a straight line); in this case the area of a rectangle polygon with a very small width around the features will be used in computations. It is always best to supply an Area value when using the Average Nearest Neighbor tool.
Although this tool will work with polygon or line data, it is most appropriate for event, incident, or other fixed-point feature data. For line and polygon features, the true geometric centroid for each feature is used in computations. For multipoint, polyline, or polygons with multiple parts, the centroid is computed using the weighted mean center of all feature parts. The weighting for point features is 1, for line features is length, and for polygon features is area.
This tool will optionally create an HTML file summarizing results. HTML files will not automatically appear in the Catalog window. If you want HTML files to be displayed in Catalog, open the ArcCatalog application, select the Customize menu option, click ArcCatalog Options, and select the File Types tab. Click on the New Type button and specify HTML for File Extension.

-
Map layers can be used to define the Input Feature Class. When using a layer with a selection, only the selected features are included in the analysis.
Syntax
AverageNearestNeighbor_stats (Input_Feature_Class, Distance_Method, {Generate_Report}, {Area})| Parameter | Explanation | Data Type |
Input_Feature_Class | The feature class, typically a point feature class, for which the average nearest neighbor distance will be calculated. | Feature Layer |
Distance_Method | Specifies how distances are calculated from each feature to neighboring features.
| String |
Generate_Report (Optional) |
| Boolean |
Area (Optional) | A numeric value representing the study area size. The default value is the area of the minimum enclosing rectangle that would encompass all features (or all selected features). Units should match those for the Output Coordinate System. | Double |
Derived Output
| Name | Explanation | Data Type |
| NNRatio | ||
| NNZScore | ||
| PValue | ||
| NNExpected | ||
| NNObserved | ||
| Report_File |
Code sample
AverageNearestNeighbor example 1 (Python window)
The following Python window script demonstrates how to use the AverageNearestNeighbor tool.
import arcpy
arcpy.env.workspace = r"C:\data"
arcpy.AverageNearestNeighbor_stats("burglaries.shp", "EUCLIDEAN_DISTANCE", "NO_REPORT", "#")
AverageNearestNeighbor example 2 (stand-alone Python script)
The following stand-alone Python script demonstrates how to use the AverageNearestNeighbor tool.
# Analyze crime data to determine if spatial patterns are statistically significant

# Import system modules
import arcpy

# Local variables...
workspace = "C:/data"
crime_data = "burglaries.shp"

try:
    # Set the current workspace (to avoid having to specify the full path to the feature classes each time)
    arcpy.env.workspace = workspace

    # Obtain Nearest Neighbor Ratio and z-score
    # Process: Average Nearest Neighbor...
    nn_output = arcpy.AverageNearestNeighbor_stats(crime_data, "EUCLIDEAN_DISTANCE", "NO_REPORT", "#")

    # Create list of Average Nearest Neighbor output values by splitting the result object
    print("The nearest neighbor index is: " + nn_output[0])
    print("The z-score of the nearest neighbor index is: " + nn_output[1])
    print("The p-value of the nearest neighbor index is: " + nn_output[2])
    print("The expected mean distance is: " + nn_output[3])
    print("The observed mean distance is: " + nn_output[4])
    print("The path of the HTML report: " + nn_output[5])

except arcpy.ExecuteError:
    # If an error occurred when running the tool, print out the error message.
    print(arcpy.GetMessages())
Environments
Licensing information
- ArcGIS Desktop Basic: Yes
- ArcGIS Desktop Standard: Yes
- ArcGIS Desktop Advanced: Yes