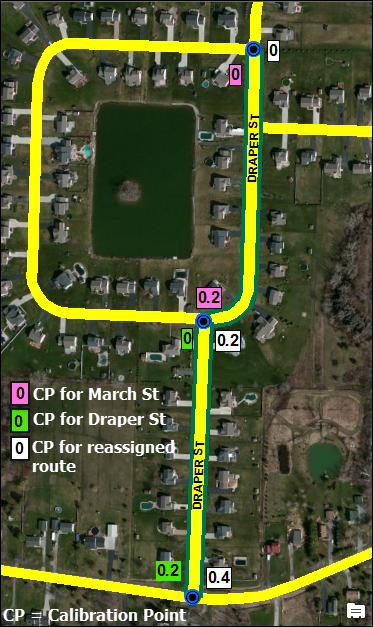
A reassignment is the way to take a portion or all of a route and assign it to another route. One example of a route reassignment is when administrative boundaries change and you need to redesignate the portion that now falls on the other side of a boundary. Routes or portions of routes can be reassigned to existing routes or new routes. In addition to reassigning the route, the Reassign Route tool can update calibration points and apply end-user-configured event behaviors located along the reassigned route. For more information, see Event behaviors.
- Start ArcMap and set up your editing environment for using Roads and Highways.
- Start an edit session and use the ArcMap navigation controls to zoom to the route portion you want to reassign.
For more information on how to start an edit session, see About edit sessions.
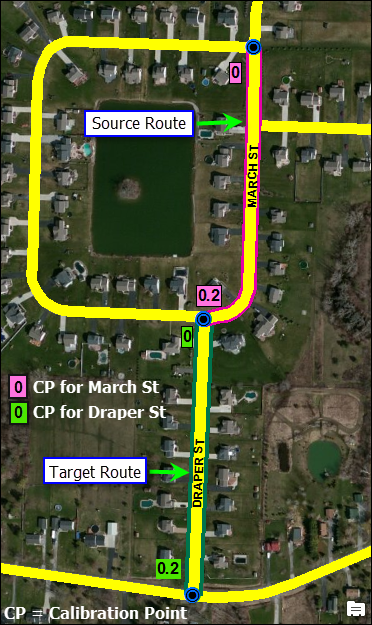
- Click the Networks drop-down arrow on the Roads And Highways Editing toolbar to choose the LRS Network layer you want to edit.
- Click the Reassign Route button
 on the Roads And Highways Editing toolbar.
The Reassign Route dialog box appears.
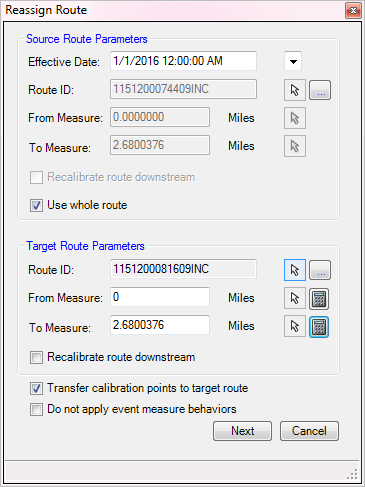
- Type the date in the Effective Date field.
This date indicates the date of reassignment of the source route. You can also use the Calendar drop-down menu to enter an effective date.
The time is automatically set to 12:00:00 AM.
- Enter a Route ID.
- Type a route ID in the Route ID text box.
- Use the Select Location tool
 to select the route you are going to reassign to another route.
- Enter a From Measure value.
- Type a From Measure value in the From Measure text box.
- Use the Select Location tool
 to click the From Measure value of the route portion you want to reassign.
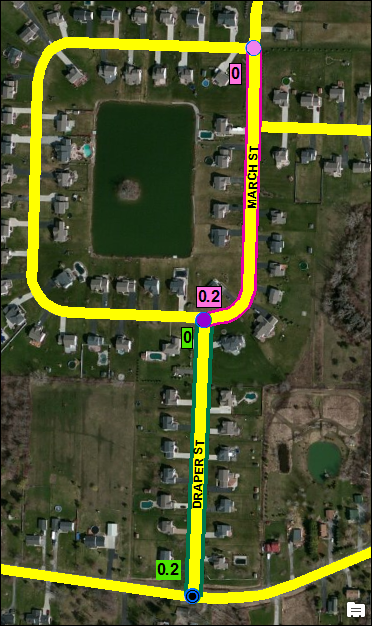
A light pink dot is placed at the location.
- Enter a To Measure value.
- Type a To Measure value in the To Measure text box.
- Use the Select Location tool
 to click the To Measure value of the route portion you want to reassign.
A dark pink dot is placed at the location.
- Choose whether you want to recalibrate the remainder of the reassigned route downstream of the reassigned portion.
- Check the Recalibrate route downstream check box to recalibrate the remainder of the reassigned route downstream of the reassigned portion.
- Uncheck the Recalibrate route downstream check box if you do not want to recalibrate the remainder of the reassigned route downstream of the reassigned portion.
- Choose whether you want to use the whole route in the reassignment.
- Check the Use whole route check box to reassign the entire route.
- Uncheck the Use whole route check box to reassign only a portion of the route.
If you use the whole route, the From Measure and To Measure fields will automatically populate with the From and To Measure values of the reassigned route.
- In the Target Route Parameters frame, enter a Route ID.
- Type a route ID in the Route ID text box.
- Use the Select Location tool
 to select the route to which you are going to assign the segment.
- Enter a From Measure value of the target route reassignment location.
- Type a From Measure value in the From Measure text box.
- Use the Select Location tool
 to click the From Measure value of the route portion you want to reassign.
 - If you do not know the From Measure value, you can allow Roads and Highways to suggest the From Measure value. The From Measure value is calculated as To Measure minus (-) the length of the reassigned portion of the route.
- Type a To Measure value.
- Click the Calculate button.
- Enter a To Measure value of the target route reassignment location.
- Type a To Measure value.
- Use the Select Location tool
 to click the To Measure value of the route portion you want to reassign.
 - If you do not know the To Measure value, you can allow Roads and Highways to suggest the To Measure value. The To Measure value is calculated as From Measure plus (+) the length of the reassigned portion of the route.
- Type a parameter To Measure value.
- Click the Calculate button.
- Choose whether you want to transfer the calibration points present in reassigned portion to the target route.
- Check the Transfer calibration points to target route check box if you want to transfer the calibration points present in the reassigned portion to the target route.
- Uncheck the Transfer calibration points to target route check box if you do not want to transfer the calibration points present in the reassigned portion to the target route.
- Choose whether you want to recalibrate the remainder of the reassigned route downstream of the reassigned portion.
- Check the Recalibrate route downstream check box to recalibrate the remainder of the reassigned route downstream of the reassigned portion.
- Uncheck the Recalibrate route downstream check box if you do not want to recalibrate the remainder of the reassigned route downstream of the reassigned portion.
The Reassign Route dialog box is fully populated.
- If you want to apply measure behaviors to the route you are reassigning, leave the Do not apply event measure behaviors box unchecked. If you do not want to apply measure behaviors along the route, check the box.
- Click Next.
The Reassign Route - Target Route Attributes dialog box appears.
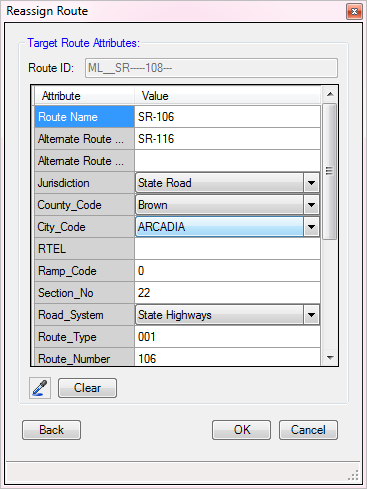
- Edit the route attributes for the target route.
The target route ID is displayed for the reference.
- To copy the attributes from a particular route, use the Copy Attributes tool to click any route on the map.
- You can use the Clear tool to clear all editable attributes and populate the defaults.
- Clicking Back will take you to the previous screen.
- Route attributes are populated by default. Route attributes that comprise the route ID are unavailable and are noneditable.
- Click OK.
If the edit activity results in introducing physical gaps in the route, a warning message appears. Clicking Yes will complete the route edit activity and introduce gaps. Clicking No will stop the edit activity and preserve the previous values.
The portion of the reassigned route is added to the target route.
