In this topic
- About building a custom feature renderer property page in Eclipse IDE
- Develop a custom renderer property page
- Create a Java project
- Create a Java class
- Create a Java class for the property page
- Associate the property page with its custom feature renderer
- Override the initGUI and apply methods
- Export as a JAR file
- Deploy the custom renderer property page
About building a custom feature renderer property page in Eclipse IDE
At ArcGIS 9.3.1, you can access custom feature renderers in ArcGIS Desktop (through ArcMap) and ArcGIS Server as well as from ArcGIS Engine applications. However, you need to create a custom property page to access your custom feature renderers in ArcGIS Desktop. The property page provides the user interface (UI) that allows desktop users to interactively set the properties of the custom renderer and apply the custom renderer to a feature layer in ArcMap. The property page UI is located on the Symbology tab of the Layer Properties dialog box in ArcMap along with other ArcGIS symbology options.
For more information about property pages, see How to implement custom property pages for custom feature renderers.
The custom feature renderer and its property page and can be developed and bundled together in one Java Archive (JAR) file and deployed to ArcGIS. If the custom feature renderer has already been developed and deployed to ArcGIS, you can build the custom renderer property page and deploy it to ArcGIS independently. The ArcGIS plug-in for Eclipse IDE provides wizards to help you create custom feature renderers and property pages.
The custom renderer wizard discussed in the topic Building a custom feature renderer in Eclipse IDE helps you create a custom feature renderer and an accompanying property page at the same time. The custom renderer property page wizard discussed in this topic helps you develop property pages for custom feature renderers that have been previously developed and deployed. The property page created by the wizard is applicable to the SimpleDispersalRenderer custom feature renderer. For the complete code for the SimpleDispersalRenderer and its property page, see the sample Simple_Dispersal_Renderer.
Implementation of a property page is similar to the workflows discussed in the How to implement property page and Building custom feature renderer topics. The code for property page implementation generated by the custom renderer wizard and the custom renderer property page wizard in Eclipse IDE are the same. The purpose of the custom renderer property page wizard is to provide an independent implementation of a property page for an existing custom feature renderer.
Develop a custom renderer property page
To develop a custom renderer property page, perform the following tasks:
Create a Java project
To create a Java project in Eclipse IDE, perform the following steps:
- Start Eclipse IDE.
- Click File, click New, and click Java Project as shown in the following screen shot:

The New Java Project, Create a Java project dialog box opens. - Type carto.customrenderer.simple_dispersal_propertypage as the project name as shown in the following screen shot:

- Click Next.
The Java Settings dialog box opens. - Click the Libraries tab and click Add Library as shown in the following screen shot:

The Add Library dialog box opens. - Select ArcGIS Engine Library and click Next.
- In the subsequent Add Library dialog box, click Finish
The Java Settings dialog box opens and ArcGIS Engine Library is added to the build path as shown in the following screen shot. - Click Finish.

You've created the carto.customrenderer.simple_dispersal_propertypage Java project. It is listed in the Package Explorer window as shown in the following screen shot:
Create a Java class
To implement the property page, you need to create a Java class that extends the javax.swing.JFrame class. This class provides the graphical user interface (GUI) that accepts the properties of the renderer. The GUI shown in the following screen shot accepts the value for the dispersal ratio property of the SimpleDispersalRenderer. This GUI will be located on the Symbology tab of the Layer Properties dialog box.

To create a Java class, perform the following steps:
- Select and right-click the carto.customrenderer.simple_dispersal_propertypage Java project.
- In the context menu, click New and click Class. The New Java Class dialog box opens.
- Type in the Java class name and click Finish.
- In the subsequent New Java Class dialog box, type in arcgissample.renderer as the package name and SimpleDispersalPropertyPageUI as the class name as shown in the following screen shot:

- Click Finish.
The SimpleDispersalPropertyPageUI Java class you created is added to the project under the arcgissample.renderer package in the Package Explorer as shown in the following screen shot:
- Create and implement the SimpleDispersalPropertyPageUI methods as shown in the following code snippet:
package arcgissample.renderer;

import java.awt.Rectangle;
import javax.swing.JFrame;
import javax.swing.JLabel;
import javax.swing.JPanel;
import javax.swing.JTextField;
import javax.swing.UIManager;
import javax.swing.border.TitledBorder;

public class SimpleRendererPropertyPageUI extends JFrame{
    private JPanel jContentPane = null;
    private JLabel jLabel = null;
    private JTextField jTextField = null;
    private JPanel jPanel = null;
    private JLabel jLabel1 = null;
    /**
     * This is the default constructor.
     */

    public SimpleRendererPropertyPageUI()throws Exception{
        initialize();
    }
    /**
     * This method initializes the frame.
     * @return void
     */
    private void initialize()throws Exception{
        this.setSize(424, 254);
        this.setResizable(false);
        this.setContentPane(getJContentPane());
        this.setTitle("Dispersal Property Page");

    }
    /**
     * This method creates a content pane for the panel.
     * @return javax.swing.JPanel
     */
    private JPanel getJContentPane()throws Exception{
        if (jContentPane == null){
            jContentPane = new JPanel();
            jContentPane.setLayout(null);
            jContentPane.add(getJPanel(), null);
        }
        return jContentPane;
    }
    /**
     * This method creates a panel.
     *
     * @return javax.swing.JPanel
     */
    private JPanel getJPanel(){
        if (jPanel == null){
            jPanel = new JPanel();
            jPanel.setLayout(null);
            jPanel.setBounds(new Rectangle(8, 14, 405, 206));
            TitledBorder titled = new TitledBorder("Change Dispersal Ratio");
            jPanel.setBorder(titled);

            //Create a label that reads: Dispersal Ratio.
            jLabel = new JLabel();
            jLabel.setText("Dispersal Ratio");
            jLabel.setBounds(new Rectangle(14, 97, 83, 27));
            //Add the label to the panel.
            jPanel.add(jLabel, null);
            //Create and add a text field to the panel that accepts the dispersal ratio value.
            jPanel.add(getJTextField(), null);

            //Create an information label.
            jLabel1 = new JLabel();
            jLabel1.setBounds(new Rectangle(12, 35, 385, 40));
            jLabel1.setText(
                "This ratio affects how far the marker symbol is moved from its original location.");
            //Add the label to the panel.
            jPanel.add(jLabel1, null);
        }
        return jPanel;
    }
    /**
     * This method creates a text field that accepts a dispersal ratio for the DispersalRenderer.
     * @return javax.swing.JTextField
     */
    public JTextField getJTextField(){
        if (jTextField == null){
            jTextField = new JTextField();
            jTextField.setBounds(new Rectangle(107, 98, 100, 27));
        }
        return jTextField;
    }
}
Create a Java class for the property page
You can use the wizard in Eclipse IDE to generate a Java class for the property page by following these steps:
- To initiate the wizard, right-click the arcgissample.renderer package.
- In the context menu, click New and click Other as shown in the following screen shot:

The Select a wizard dialog box opens. - Expand the ESRI Templates, ArcGIS Extension, and Property Page nodes.
- Select Custom Renderer Property Page and click Next as shown in the following screen shot:

The New Custom Renderer Property Page Extension dialog box opens. - Type in SimpleDispersalPropertyPage as the Java class name.
You need to associate the property page with a corresponding custom feature renderer.
Associate the property page with its custom feature renderer
To associate the property page with its custom feature renderer, use one of the following options:
- Root directory—If the custom feature renderer .java file is available in Eclipse, browse the list of folders under the Eclipse workspace and associate the custom feature renderer .java file appropriately
- Archive file—If the custom feature renderer is available as a JAR file from an external location, browse to the external location and associate the .class file of the custom feature renderer appropriately.
To associate the custom renderer from an external location, perform the following steps:
- Click Browse on the New Custom Renderer Property Page Extension dialog box as shown in the following screen shot:

The Select jar containing Custom Renderer dialog box opens. - Browse to the JAR location and select it. The classes bundled in the JAR file are listed.
- Select the appropriate custom feature renderer class file and click OK as shown in the following screen shot:

The Update Project Library Path message box opens as shown in the following screen shot. The JAR file location is added to the current project classpath. - Click OK.

The JAR file location you selected is added to the archive file location as shown in the following screen shot. - Click Finish.

The property page Java class you created is added to the project in the Package Explorer. The JAR file location is also added under Referenced Libraries as shown in the following screen shot:
SimpleDispersalPropertyPage Java class is annotated with @ArcGISExtension, the category attribute is set to ArcGISCategories.ESRIRendererPropertyPages, and the Java class extends the BaseCustomRendererPropertyPage class. The wizard generated implementations for the overridden methods of BaseCustomRendererPropertyPage. The generated code for the getCustomRendererDef() method returns the custom feature renderer that you associated to the property page. See the following screen shot:
Override the initGUI and apply methods
The wizard generated implementation for the getCustomRendererDef(), getDescription(), getName(), getPreviewImage(), getType() and getPriority() methods. However, implementation for the initGUI() and apply() methods must be added. The purpose and implementation of these methods are described as follows:
- initGUI—The initGUI() method creates an instance of the GUI form previously created in this topic. This GUI form is located on the Symbology tab of the Layer Properties dialog box in ArcMap and allows custom feature renderer properties to be set as shown in the following code snippet:
//instance variable: The GUI form created using the previous code snippet.
SimpleDispersalPropertyPageUI simplePropertyPageUI;

//This method returns the GUI form instance to the framework.
public JFrame initGUI(IFeatureRenderer arg0){

    try{
        this.simplePropertyPageUI = new SimpleDispersalPropertyPageUI();
    }
    catch (Exception e){
        e.printStackTrace();
    }
    return simplePropertyPageUI;
}
- apply—Implementation of the apply() method allows you to apply the property values from the GUI form to the renderer. In the case of SimpleDispersalRenderer, the dispersal ratio from the GUI form text field is applied as the property of SimpleDispersalRenderer as shown in the following code snippet:
//instance variable: The GUI form.
SimpleDispersalPropertyPageUI simplePropertyPageUI;

//This method applies the properties retrieved from the GUI dialog box.
public void apply(IFeatureRenderer arg0){

    SimpleDispersalRenderer simpleRenderer = (SimpleDispersalRenderer)arg0;

    //Retrieve the value from the text field of the form.
    String dispersalRatio = this.simplePropertyPageUI.getJTextField().getText();

    //Set the property of the custom renderer.
    simpleRenderer.setDispersalRatio(Double.parseDouble(dispersalRatio));
}
For more information about these methods, see How to implement custom property pages for custom feature renderers.
Export as a JAR file
The custom feature renderer property page you created must be deployed to ArcGIS to be consumed in ArcGIS Desktop (ArcMap). Deploy the property page and the class files of the Java classes by exporting them as a JAR file called simple_dispersal_property_page.jar. Be sure to include the custom renderer JAR file location in the class-path entry of the manifest file. For example:
Manifest-Version: 1.0
Class-Path: c:/ArcGIS/java/lib/ext/simple_dispersal_renderer.jar
Class-Path: c:/ArcGIS/java/lib/ext/simple_dispersal_renderer.jar
For more information about how to create a JAR file, see How to export extension classes as a JAR file.
Deploy the custom renderer property page
The custom feature renderer property page is deployed to ArcGIS by placing the JAR file in the <ArcGIS Install Dir>/java/lib/ext folder. ArcMap recognizes the property page by its annotation when the application is started. If ArcMap is already running, you need to restart it after the JAR file is deployed. If you modify the code in the Java classes bundled in the JAR file, recreate and redeploy the JAR file.
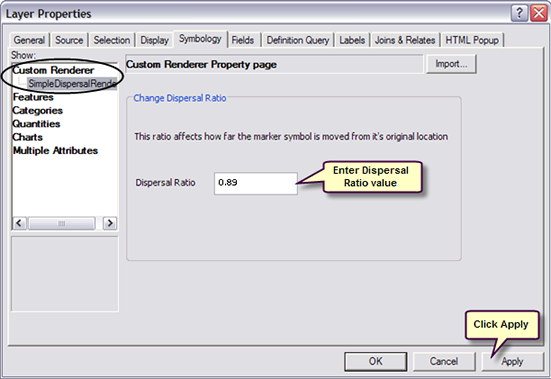
Ensure that the JAR file of the associated custom feature renderer is also deployed to ArcGIS. On restarting ArcMap, the property page can be accessed through the Symbology tab of the Layer Properties dialog box. See the following screen shot:
See Also:
Building a custom feature renderer in Eclipse IDEHow to implement custom feature renderers
Implementing persistence for a custom feature renderer
How to implement TOC legends for custom feature renderers
| Development licensing | Deployment licensing |
|---|---|
| Engine Developer Kit | Engine |
| Server | Server |
| ArcGIS for Desktop Basic | ArcGIS for Desktop Basic |
| ArcGIS for Desktop Standard | ArcGIS for Desktop Standard |
| ArcGIS for Desktop Advanced | ArcGIS for Desktop Advanced |