
In this topic
- Project description
- Concepts
- Design
- Implementation
- Loading the ArcGIS Engine controls
- Embedding the ArcGIS Engine controls in a container
- Loading an ArcGIS runtime
- Initializing the license using the LicenseControl
- Loading map documents into MapControl and PageLayoutControl
- Setting the ToolbarControl and TOCControl buddy controls
- Handling form resize
- Adding commands to the ToolbarControl
- Creating a pop-up menu for the PageLayoutControl
- Creating a palette of tools
- Managing label editing in the TOCControl
- Drawing shapes on the MapControl
- Creating a custom tool
- Customizing the ToolbarControl
- Saving and loading ToolbarControl items
- Printing the page layout
- Deployment
- Additional resources
Project description
This topic demonstrates the required steps to create a GIS application for viewing pre-authored ESRI map documents (*.mxd).
Concepts
The scenario in this topic is implemented using the Microsoft Visual Studio .NET development environment and uses the ESRI interop assemblies to host the ArcGIS Engine controls inside .NET Windows controls in a .NET form. These interoperability assemblies act as a bridge between the unmanaged code of the Component Object Model (COM) and the managed .NET code. Any references to the members of the COM ArcGIS Engine controls are routed to the interop assemblies and forwarded to the actual COM object. Likewise, responses from the COM object are routed to the interop assembly and forwarded to the .NET application.
Each ArcGIS Engine control has events, properties, and methods that can be accessed once they're embedded in a container, such as a .NET form. The objects and functionality in each control can be combined with other ArcObjects and custom controls to create customized end user applications.
The scenario is written in C# and Visual Basic .NET (VB .NET).
The MapControl, PageLayoutControl, TOCControl, and ToolbarControl are used in this scenario to provide the user interface (UI) of the application, and the LicenseControl is used to configure the application with an appropriate license. The ArcGIS Engine controls are used in conjunction with other ArcObjects and control commands to create a GIS map viewing application.
Design
The scenario highlights how the ArcGIS Engine controls interact with each other and exposes a part of each ArcGIS Engine control's object model.
Each .NET ArcGIS Engine control has a set of property pages that can be accessed once the control is embedded in a .NET form. These property pages provide shortcuts to a selection of a control's properties and methods and allow you to build an application without writing any code. This scenario does not use the property pages but rather builds the application programmatically.
The ESRI.ArcGIS.AxControls .NET Framework component represents each control that is hosted in a .NET form, while the ESRI.ArcGIS.Controls assembly contains the object and interfaces from inside each control's type library.
Implementation
The following implementation provides the necessary code to successfully complete the scenario. It does not provide step-by-step instructions to develop applications in Microsoft Visual Studio .NET, as it is assumed that you already have a working knowledge of the development environment.
Loading the ArcGIS Engine controls
Before you start programming your application, load the ArcGIS Engine controls and other ArcGIS Engine assembly references that the application uses into the development environment by performing the following steps:
- Start Visual Studio and create a Visual C# or Visual Basic Windows Forms Application project from the New Project dialog box.
- Name the project Controls and browse to a location to save the project.
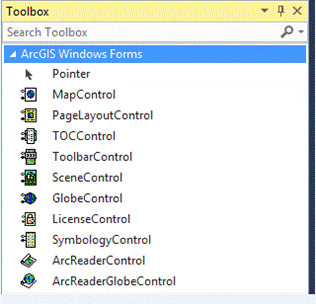
- On the Toolbox, click ArcGIS Windows Forms. The ArcGIS Engine controls appear. If there is no ArcGIS Windows Forms, right-click the Toolbox, then click Choose Items.
- On the Choose Toolbox Items dialog box, click the .NET Framework Components tab and select AxLicenseControl, AxMapControl, AxPageLayoutControl, AxTOCControl, and AxToolbarControl, then click OK. The controls appear in the Toolbox. See the following screen shot:
- Click the Project menu and click Add ArcGIS Reference.
- On the Add ArcGIS Reference dialog box, double-click ESRI.ArcGIS.ADF.Local, ESRI.ArcGIS.Carto, ESRI.ArcGIS.Display, ESRI.ArcGIS.Geometry, ESRI.ArcGIS.Output, ESRI.ArcGIS.System, ESRI.ArcGIS.SystemUI, and ESRI.ArcGIS.Version to select them, then click Finish. See the following screen shot:

The ESRI .NET assemblies will be used to instantiate and make calls on the objects in the ESRI object libraries from your C# or VB .NET project using the COM interoperability services provided by the .NET Framework.
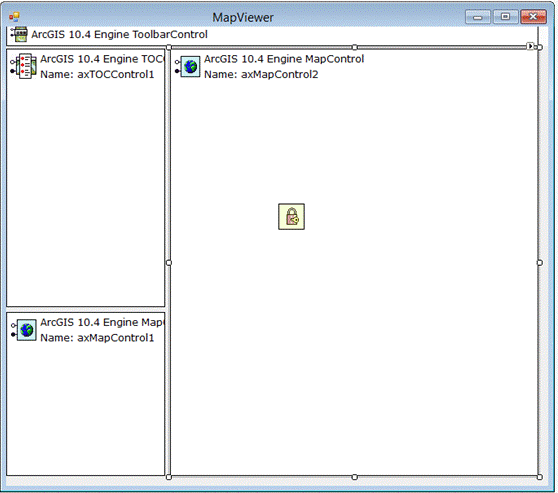
- Rename the .NET form from Form1 to MapViewer.
- Open the .NET form in design mode.
- Double-click MenuStrip under Menus and Toolbars in the Toolbox.
- Double-click LicenseControl under ArcGIS Windows Forms in the Toolbox to add a LicenseControl to the form.
- Repeat step 4 to add the MapControl, PageLayoutControl, TOCControl, and ToolbarControl.
- Resize and reposition each control on the form as shown in the following screen shot:
- Double-click the form to display the form's code window. Add using directives or Imports statements in the following code example to the top of the code window:
In .NET, a variable is fully-qualified using a namespace. Namespaces are a concept in .NET that allow objects to be organized hierarchically, regardless of the assembly in which they are defined. To make code simpler and more readable, the directives act as shortcuts when referencing items specified in namespaces.
If you start by typing ESRI, the autocompletion feature of IntelliSense allows you to complete the next section of code by pressing the Tab key.
Remember, C# is case sensitive. By default, when the project is created, C# adds using directives to some of the system namespaces.
using ESRI.ArcGIS.Carto;
using ESRI.ArcGIS.Controls;
using ESRI.ArcGIS.Display;
using ESRI.ArcGIS.Geometry;
using ESRI.ArcGIS.SystemUI;
using ESRI.ArcGIS.esriSystem;
Imports ESRI.ArcGIS.Carto
Imports ESRI.ArcGIS.Controls
Imports ESRI.ArcGIS.Display
Imports ESRI.ArcGIS.Geometry
Imports ESRI.ArcGIS.SystemUI
Imports ESRI.ArcGIS.esriSystem
Loading an ArcGIS runtime
Stand-alone ArcGIS applications must locate the appropriate ArcGIS product installation before any ArcObjects code (including license initialization) is called. This applies whether license initialization is carried out using the LicenseControl, such as in the following code example, or by using the AoInitialize class. The APIs used to bind to the appropriate ArcGIS runtime are in the ESRI.ArcGIS.RuntimeManager class in the ESRI.ArcGIS namespace.
ArcGIS runtime code should be added to the application's entry point, similar to the updated MapControl Application and GlobeControl Application project templates. Add the following code example at your program's entry point:
[C#] using ESRI.ArcGIS;
... static class Program
{
/// <summary>
/// The main entry point for the application.
/// </summary>
[STAThread] static void Main()
{
if (!RuntimeManager.Bind(ProductCode.EngineOrDesktop))
{
MessageBox.Show(
"Unable to bind to ArcGIS runtime. Application will be shut down.");
return ;
}
Application.EnableVisualStyles();
Application.SetCompatibleTextRenderingDefault(false);
Application.Run(new MainForm());
}
}
Imports ESRI.ArcGIS
...
<STAThread()> _
           Shared Sub Main()
    'Load runtime
    If Not RuntimeManager.Bind(ProductCode.EngineOrDesktop) Then
        MessageBox.Show("Unable to bind to ArcGIS runtime. Application will be shut down.")
        System.Environment.Exit(1) ' Force exit or other indication in the application
    End If
    Application.Run(New MainForm())
End Sub
Initializing the license using the LicenseControl
To successfully deploy this application on another machine, the application must configure a license. First, it must check that a product license is available and second, it must initialize the product license. If this license configuration fails, the application cannot run. License configuration can be performed by using the LicenseControl or by programmatically using the AoInitialize object. For the purpose of this application, the LicenseControl will be used to handle license configuration.
When developing a stand-alone executable using ArcObjects, it is the responsibility of the application to check and configure the licensing options. A license can be configured using the LicenseControl or the AoInitialize class and the IAoInitialize interface it implements that supports license configuration. License initialization must be performed when the application starts, before any ArcObjects functionality is accessed. Failure to do so results in application errors.
To initialize the license using the LicenseControl, follow these steps:
- Open the .NET form in design mode.
- Right-click the LicenseControl and click ActiveX-Properties. The LicenseControl property pages appear.
- Under the Products area, select the ArcGIS Engine check box, select the Shutdown this application if the selected licenses are not available check box, then click OK. See the following screen shot:
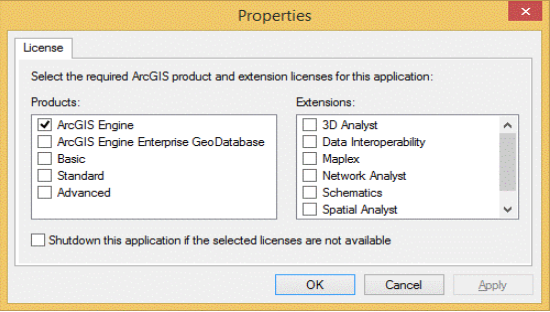
The LicenseControl appears on a form at design time so that it can be selected and its property pages viewed. However, at run time, the LicenseControl is invisible, making its position on the form irrelevant.
This application can be initialized with an ArcGIS Engine license, but you can optionally initialize the application with a higher product license. For example, if you select the ArcGIS Engine license and the ArcView license check boxes, the LicenseControl initially tries to initialize the application with an ArcGIS Engine license (the lower license). If that license is not available, the LicenseControl tries to initialize the application with an ArcView license (the next higher level license selected). If no product licenses are available, the application fails to initialize.
In this application, the LicenseControl handles license initialization failure. If the application cannot be initialized with an ArcGIS Engine product license, a License Failure dialog box opens before the application is automatically shut down. Alternatively, you can handle license initialization failure using the ILicenseControl interface members to obtain information on the nature of the failure before the application is programmatically shut down.
Loading map documents into PageLayoutControl and MapControl
Individual data layers or pre-authored map documents can be loaded into the MapControl and PageLayoutControl. You can load the provided sample map document or you can load a map document of your own. Later, you will add a command to browse to a map document.
To load a map document into the PageLayoutControl and MapControl, follow these steps;
- Select the Form_Load event and add the code in the following code example (you might need to alter the relative path to the map document or substitute the file name if you're using your own map document):
private void MapViewer_Load(object sender, System.EventArgs e)
{
    //Load a pre-authored map document into the PageLayoutControl using relative paths.
    string fileName=@"..\..\..\..\data\GulfOfStLawrence\Gulf_of_St._Lawrence.mxd";
    if (axPageLayoutControl1.CheckMxFile(fileName))
        axPageLayoutControl1.LoadMxFile(fileName, "");
}
Private Sub MapViewer_Load(ByVal sender As System.Object, ByVal e As System.EventArgs) Handles MyBase.Load
    'Load a pre-authored map document into the PageLayoutControl using realative paths.
    Dim sFileName As String="..\..\..\..\data\GulfOfStLawrence\Gulf_of_St._Lawrence.mxd"
    If AxPageLayoutControl1.CheckMxFile(sFileName) Then
        AxPageLayoutControl1.LoadMxFile(sFileName)
    End If
End Sub
- Display the form in design mode, select axPageLayoutControl1 from the Properties window, and show the PageLayoutControl events.
- Double-click the OnPageLayoutReplaced event to add an event handler to the code window. See the following screen shot:

- In the PageLayoutControl_OnPageLayoutReplaced event, add the following code example to load the same map document into the MapControl. The OnPageLayoutReplaced event is triggered when a document is loaded into the PageLayoutControl.
private void axPageLayoutControl1_OnPageLayoutReplaced(object sender,
    IPageLayoutControlEvents_OnPageLayoutReplacedEvent e)
{
    //Load the same pre-authored map document into the MapControl.
    axMapControl1.LoadMxFile(axPageLayoutControl1.DocumentFilename, null, null);
    //Set the extent of the MapControl to the full extent of the data.
    axMapControl1.Extent=axMapControl1.FullExtent;
}
Private Sub AxPageLayoutControl1_OnPageLayoutReplaced(ByVal sender As System.Object, ByVal e As ESRI.ArcGIS.Controls.IPageLayoutControlEvents_OnPageLayoutReplacedEvent) Handles AxPageLayoutControl1.OnPageLayoutReplaced
    'Load the same pre-authored map document into the MapControl.
    AxMapControl1.LoadMxFile(AxPageLayoutControl1.DocumentFilename)
    'Set the extent of the MapControl to the full extent of the data.
    AxMapControl1.Extent=AxMapControl1.FullExtent
End Sub
Setting the TOCControl and ToolbarControl buddy controls
For the purpose of this application, the TOCControl and ToolbarControl work in conjunction with the PageLayoutControl, rather than the MapControl. To do this, set the PageLayoutControl as the buddy control. The TOCControl uses the buddy control's ActiveView to populate itself with maps, layers, and symbols, while any command, tool, menu, or palette items on the ToolbarControl will interact with the buddy control's display.
To set the TOCControl and ToolbarControl buddy controls, follow these steps:
- In the Form_Load event, type the following code example before the load document code:
private void MapViewer_Load(object sender, System.EventArgs e)
{
    //Set buddy controls.
    axTOCControl1.SetBuddyControl(axPageLayoutControl1);
    axToolbarControl1.SetBuddyControl(axPageLayoutControl1);

    //Load a pre-authored map document into the PageLayoutControl using relative paths.
}
Private Sub MapViewer_Load(ByVal sender As System.Object, ByVal e As System.EventArgs) Handles MyBase.Load
    'Set buddy controls.
    AxTOCControl1.SetBuddyControl(AxPageLayoutControl1)
    AxToolbarControl1.SetBuddyControl(AxPageLayoutControl1)

    'Load a pre-authored map document into the PageLayoutControl using realative paths.
End Sub
- Build and run the application. The map document is loaded into the PageLayoutControl and the TOCControl lists the data layers in the map document.
- Use the TOCControl to toggle layer visibility by selecting and clearing the check boxes. By default, the focus map of the map document is loaded into the MapControl. At this point, the ToolbarControl is empty because no commands have been added.
- Resize the form and notice that the controls do not change size. See the following screen shot:

Handling form resize
When the form is resized at run time, the PageLayoutControl and MapControl do not automatically resize. To resize the controls so that they always fill the extent of the form, anchor the controls to the form. If the PageLayoutControl or MapControl contains a lot of data, redrawing this data while the form is resized can be costly. To increase performance, suppress the data redraw until the resizing is complete. During the resize, a stretched bitmap draws instead. See the following steps:
- Display the form in design mode and select axPageLayoutControl1 from the Properties window. Click the Anchor property and anchor the PageLayoutControl to the top, left, bottom, and right of the form. See the following screen shot:

- Repeat the steps to anchor the MapControl to the top, left, and bottom of the form. See the following screen shot:

- Display the form in design mode, select the form from the Properties window, and display the form events.
- Double-click the ResizeBegin event to add an event handler to the code window.
- In the Form_ResizeBegin event, add the following code example to draw a stretchy bitmap in the PageLayoutControl and MapControl whenever the form is resized:
private void MapViewer_ResizeBegin(object sender, EventArgs e)
{
    //Suppress data redraw and draw bitmap instead.
    axMapControl1.SuppressResizeDrawing(true, 0);
    axPageLayoutControl1.SuppressResizeDrawing(true, 0);
}
Private Sub MapViewer_ResizeBegin(ByVal sender As System.Object, ByVal e As System.EventArgs) Handles MyBase.ResizeBegin
    'Suppress data redraw and draw bitmap instead.
    AxMapControl1.SuppressResizeDrawing(True, 0)
    AxPageLayoutControl1.SuppressResizeDrawing(True, 0)
End Sub
- Display the form in design mode and select the form from the Properties window and display the form events.
- Double-click the ResizeEnd event to add an event handler to the code window.
- In the Form_ResizeEnd event, add the following code example to stop drawing a stretchy bitmap in the PageLayoutControl and MapControl:
private void MapViewer_ResizeEnd(object sender, EventArgs e)
{
    //Stop bitmap draw and draw data.
    axMapControl1.SuppressResizeDrawing(false, 0);
    axPageLayoutControl1.SuppressResizeDrawing(false, 0);
}
Private Sub MapViewer_ResizeEnd(ByVal sender As System.Object, ByVal e As System.EventArgs) Handles MyBase.ResizeEnd
    'Stop bitmap draw and draw data.
    AxMapControl1.SuppressResizeDrawing(False, 0)
    AxPageLayoutControl1.SuppressResizeDrawing(False, 0)
End Sub
- Build and run the application, then resize the form.
Adding commands to the ToolbarControl
ArcGIS Engine comes with more than 230 commands and tools that work directly with the MapControl, PageLayoutControl, and ToolbarControl. These commands and tools provide you with a lot of frequently used GIS functionality for map navigation, map inquiry, graphics management, and feature selection. In addition, there are commands and tools to work with the ArcGIS Engine extensions.
To add some of these commands and tools to your application to work with the PageLayoutControl, follow these steps:
- In the Form_Load event, add the following code example before the set buddy controls code:
private void MapViewer_Load(object sender, EventArgs e)
{
    //Add generic commands.
    axToolbarControl1.AddItem("esriControls.ControlsOpenDocCommand",  - 1,  - 1,
        false, 0, esriCommandStyles.esriCommandStyleIconOnly);
    axToolbarControl1.AddItem("esriControls.ControlsAddDataCommand",  - 1,  - 1,
        false, 0, esriCommandStyles.esriCommandStyleIconOnly);
    //Add page layout navigation commands.
    axToolbarControl1.AddItem("esriControls.ControlsPageZoomInTool",  - 1,  - 1,
        true, 0, esriCommandStyles.esriCommandStyleIconOnly);
    axToolbarControl1.AddItem("esriControls.ControlsPageZoomOutTool",  - 1,  - 1,
        false, 0, esriCommandStyles.esriCommandStyleIconOnly);
    axToolbarControl1.AddItem("esriControls.ControlsPagePanTool",  - 1,  - 1, false,
        0, esriCommandStyles.esriCommandStyleIconOnly);
    axToolbarControl1.AddItem("esriControls.ControlsPageZoomWholePageCommand",  - 1,
        - 1, false, 0, esriCommandStyles.esriCommandStyleIconOnly);
    //Add map navigation commands.
    axToolbarControl1.AddItem("esriControls.ControlsMapZoomInTool",  - 1,  - 1, true,
        0, esriCommandStyles.esriCommandStyleIconOnly);
    axToolbarControl1.AddItem("esriControls.ControlsMapZoomOutTool",  - 1,  - 1,
        false, 0, esriCommandStyles.esriCommandStyleIconOnly);
    axToolbarControl1.AddItem("esriControls.ControlsMapPanTool",  - 1,  - 1, false,
        0, esriCommandStyles.esriCommandStyleIconOnly);
    axToolbarControl1.AddItem("esriControls.ControlsMapFullExtentCommand",  - 1,  -
        1, false, 0, esriCommandStyles.esriCommandStyleIconOnly);
    axToolbarControl1.AddItem("esriControls.ControlsMapZoomToLastExtentBackCommand",
        - 1,  - 1, false, 0, esriCommandStyles.esriCommandStyleIconOnly);
    axToolbarControl1.AddItem(
        "esriControls.ControlsMapZoomToLastExtentForwardCommand",  - 1,  - 1, false,
        0, esriCommandStyles.esriCommandStyleIconOnly);
    //Add map inquiry commands.
    axToolbarControl1.AddItem("esriControls.ControlsMapIdentifyTool",  - 1,  - 1,
        true, 0, esriCommandStyles.esriCommandStyleIconOnly);
    axToolbarControl1.AddItem("esriControls.ControlsMapFindCommand",  - 1,  - 1,
        false, 0, esriCommandStyles.esriCommandStyleIconOnly);
    axToolbarControl1.AddItem("esriControls.ControlsMapMeasureTool",  - 1,  - 1,
        false, 0, esriCommandStyles.esriCommandStyleIconOnly);

    //Set buddy controls.
}
Private Sub MapViewer_Load(ByVal sender As System.Object, ByVal e As System.EventArgs) Handles MyBase.Load
    'Add generic commands.
    AxToolbarControl1.AddItem("esriControls.ControlsOpenDocCommand", -1, -1, False, 0, esriCommandStyles.esriCommandStyleIconOnly)
    AxToolbarControl1.AddItem("esriControls.ControlsAddDataCommand", -1, -1, False, 0, esriCommandStyles.esriCommandStyleIconOnly)
    'Add page layout navigation commands.
    AxToolbarControl1.AddItem("esriControls.ControlsPageZoomInTool", -1, -1, True, 0, esriCommandStyles.esriCommandStyleIconOnly)
    AxToolbarControl1.AddItem("esriControls.ControlsPageZoomOutTool", -1, -1, False, 0, esriCommandStyles.esriCommandStyleIconOnly)
    AxToolbarControl1.AddItem("esriControls.ControlsPagePanTool", -1, -1, False, 0, esriCommandStyles.esriCommandStyleIconOnly)
    AxToolbarControl1.AddItem("esriControls.ControlsPageZoomWholePageCommand", -1, -1, False, 0, esriCommandStyles.esriCommandStyleIconOnly)
    'Add map navigation commands.
    AxToolbarControl1.AddItem("esriControls.ControlsMapZoomInTool", -1, -1, True, 0, esriCommandStyles.esriCommandStyleIconOnly)
    AxToolbarControl1.AddItem("esriControls.ControlsMapZoomOutTool", -1, -1, False, 0, esriCommandStyles.esriCommandStyleIconOnly)
    AxToolbarControl1.AddItem("esriControls.ControlsMapPanTool", -1, -1, False, 0, esriCommandStyles.esriCommandStyleIconOnly)
    AxToolbarControl1.AddItem("esriControls.ControlsMapFullExtentCommand", -1, -1, False, 0, esriCommandStyles.esriCommandStyleIconOnly)
    AxToolbarControl1.AddItem("esriControls.ControlsMapZoomToLastExtentBackCommand", -1, -1, False, 0, esriCommandStyles.esriCommandStyleIconOnly)
    AxToolbarControl1.AddItem("esriControls.ControlsMapZoomToLastExtentForwardCommand", -1, -1, False, 0, esriCommandStyles.esriCommandStyleIconOnly)
    'Add map inquiry commands.
    AxToolbarControl1.AddItem("esriControls.ControlsMapIdentifyTool", -1, -1, True, 0, esriCommandStyles.esriCommandStyleIconOnly)
    AxToolbarControl1.AddItem("esriControls.ControlsMapFindCommand", -1, -1, False, 0, esriCommandStyles.esriCommandStyleIconOnly)
    AxToolbarControl1.AddItem("esriControls.ControlsMapMeasureTool", -1, -1, False, 0, esriCommandStyles.esriCommandStyleIconOnly)

    'Set buddy controls.
End Sub
- Build and run the application. The ToolbarControl now contains ArcGIS Engine commands and tools that you can use to navigate the map document loaded into the PageLayoutControl.
- Use the page layout commands to navigate around the actual page layout, and the map commands to navigate around the data in the data frames.
- Use the open document command to browse and load map documents, and the add data command to browse and load data layers. See the following screen shot:

Creating a pop-up menu for the PageLayoutControl
In addition to adding ArcGIS Engine commands to the ToolbarControl to work with the buddy control (as in the previous steps), you can also create pop-up menus and palettes from the ArcGIS Engine commands.
To add a pop-up menu to your application that works with the PageLayoutControl, perform the following steps. The pop-up menu appears when you right-click the display area of the PageLayoutControl.
- Add the following member variable to the class:
public partial class MapViewer: Form
{
    //The pop-up menu.
    private IToolbarMenu m_ToolbarMenu;
}
Public Class MapViewer
    'The pop-up menu.
    Private m_pToolbarMenu As IToolbarMenu
End Class
- Add the following code example to the Form_Load event after the code, add the commands to the ToolbarControl but before the set buddy controls code:
private void MapViewer_Load(object sender, EventArgs e)
{
    //Add map inquiry commands.

    //Create a ToolbarMenu.
    m_ToolbarMenu=new ToolbarMenuClass();
    //Share the ToolbarControl's command pool.
    m_ToolbarMenu.CommandPool=axToolbarControl1.CommandPool;
    //Set the hook to the PageLayoutControl.
    m_ToolbarMenu.SetHook(axPageLayoutControl1);
    //Add commands to the ToolbarMenu.
    m_ToolbarMenu.AddItem("esriControls.ControlsPageZoomInFixedCommand",  - 1,  - 1,
        false, esriCommandStyles.esriCommandStyleIconAndText);
    m_ToolbarMenu.AddItem("esriControls.ControlsPageZoomOutFixedCommand",  - 1,  - 1,
        false, esriCommandStyles.esriCommandStyleIconAndText);
    m_ToolbarMenu.AddItem("esriControls.ControlsPageZoomWholePageCommand",  - 1,  -
        1, false, esriCommandStyles.esriCommandStyleIconAndText);
    m_ToolbarMenu.AddItem("esriControls.ControlsPageZoomPageToLastExtentBackCommand",
        - 1,  - 1, true, esriCommandStyles.esriCommandStyleIconAndText);
    m_ToolbarMenu.AddItem(
        "esriControls.ControlsPageZoomPageToLastExtentForwardCommand",  - 1,  - 1,
        false, esriCommandStyles.esriCommandStyleIconAndText);

    //Set buddy controls.
}
Private Sub MapViewer_Load(ByVal sender As System.Object, ByVal e As System.EventArgs) Handles MyBase.Load
    'Add map inquiry commands.

    'Create a ToolbarMenu.
    m_pToolbarMenu=New ToolbarMenuClass()
    'Share the ToolbarControl's command pool.
    m_pToolbarMenu.CommandPool=AxToolbarControl1.CommandPool
    'Set the hook to the PageLayoutControl.
    m_pToolbarMenu.SetHook(AxPageLayoutControl1)
    'Add commands to the ToolbarMenu.
    m_pToolbarMenu.AddItem("esriControls.ControlsPageZoomInFixedCommand", -1, -1, False, esriCommandStyles.esriCommandStyleIconAndText)
    m_pToolbarMenu.AddItem("esriControls.ControlsPageZoomOutFixedCommand", -1, -1, False, esriCommandStyles.esriCommandStyleIconAndText)
    m_pToolbarMenu.AddItem("esriControls.ControlsPageZoomWholePageCommand", -1, -1, False, esriCommandStyles.esriCommandStyleIconAndText)
    m_pToolbarMenu.AddItem("esriControls.ControlsPageZoomPageToLastExtentBackCommand", -1, -1, True, esriCommandStyles.esriCommandStyleIconAndText)
    m_pToolbarMenu.AddItem("esriControls.ControlsPageZoomPageToLastExtentForwardCommand", -1, -1, False, esriCommandStyles.esriCommandStyleIconAndText)

    'Set buddy controls.
End Sub
- Display the form in design mode, select axPageLayoutControl1 from the Properties window, and display the PageLayoutControl events.
- Double-click the OnMouseDown event to add an event handler to the code window.
- In the PageLayoutControl_OnMouseDown event, add the following code example:
private void axPageLayoutControl1_OnMouseDown(object sender,
    IPageLayoutControlEvents_OnMouseDownEvent e)
{
    //Pop-up the ToolbarMenu.
    if (e.button == 2)
        m_ToolbarMenu.PopupMenu(e.x, e.y, axPageLayoutControl1.hWnd);
}
Private Sub AxPageLayoutControl1_OnMouseDown(ByVal sender As System.Object, ByVal e As ESRI.ArcGIS.Controls.IPageLayoutControlEvents_OnMouseDownEvent) Handles AxPageLayoutControl1.OnMouseDown
    'Pop-up the ToolbarMenu.
    If e.button=2 Then
        m_pToolbarMenu.PopupMenu(e.x, e.y, AxPageLayoutControl1.hWnd)
    End If
End Sub
-
Build and run the application.
-
Right-click the PageLayoutControl's display area to show the pop-up menu and navigate around the page layout. See the following screen shot:

Creating a palette of tools
In addition to creating stand-alone pop-up menus and palettes to work with a control (as in the previous steps), menus and palettes can be added to a ToolbarControl.
To create a palette containing ArcGIS Engine commands and add the palette to the ToolbarControl, follow these steps:
- Add the following code example to the Form_Load event before the add commands to the ToolbarMenu code:
private void MapViewer_Load(object sender, EventArgs e)
{
    //Add map inquiry commands.

    //Create a ToolbarPalette.
    IToolbarPalette toolbarPalette=new ToolbarPaletteClass();
    //Add commands and tools to the ToolbarPalette.
    toolbarPalette.AddItem("esriControls.ControlsNewMarkerTool",  - 1,  - 1);
    toolbarPalette.AddItem("esriControls.ControlsNewLineTool",  - 1,  - 1);
    toolbarPalette.AddItem("esriControls.ControlsNewCircleTool",  - 1,  - 1);
    toolbarPalette.AddItem("esriControls.ControlsNewEllipseTool",  - 1,  - 1);
    toolbarPalette.AddItem("esriControls.ControlsNewRectangleTool",  - 1,  - 1);
    toolbarPalette.AddItem("esriControls.ControlsNewPolygonTool",  - 1,  - 1);
    //Add the ToolbarPalette to the ToolbarControl.
    axToolbarControl1.AddItem(toolbarPalette, 0,  - 1, false, 0,
        esriCommandStyles.esriCommandStyleIconOnly);

    //Add commands to the ToolbarMenu.
}
Private Sub MapViewer_Load(ByVal sender As System.Object, ByVal e As System.EventArgs) Handles MyBase.Load
    'Add map inquiry commands

    'Create a ToolbarPalette.
    Dim pToolbarPalette As IToolbarPalette=New ToolbarPaletteClass()
    'Add commands and tools to the ToolbarPalette.
    pToolbarPalette.AddItem("esriControls.ControlsNewMarkerTool", -1, -1)
    pToolbarPalette.AddItem("esriControls.ControlsNewLineTool", -1, -1)
    pToolbarPalette.AddItem("esriControls.ControlsNewCircleTool", -1, -1)
    pToolbarPalette.AddItem("esriControls.ControlsNewEllipseTool", -1, -1)
    pToolbarPalette.AddItem("esriControls.ControlsNewRectangleTool", -1, -1)
    pToolbarPalette.AddItem("esriControls.ControlsNewPolygonTool", -1, -1)
    'Add the ToolbarPalette to the ToolbarControl.
    AxToolbarControl1.AddItem(pToolbarPalette, 0, -1, False, 0, esriCommandStyles.esriCommandStyleIconOnly)

    'Add commands to the ToolbarMenu.
End Sub
- Build and run the application.
- Use the palette on the ToolbarControl to add graphic elements to the PageLayoutControl's display. See the following screen shot:

Managing label editing in the TOCControl
By default, the TOCControl allows users to automatically toggle the visibility of layers and to change the map and layer names that appear in the table of contents (TOC).
To add code to prevent users from editing a name and replacing it with an empty string, follow these steps:
- Add the following code example to the beginning of the Form_Load event:
private void MapViewer_Load(object sender, EventArgs e)
{
    //Set label editing to manual.
    axTOCControl1.LabelEdit=esriTOCControlEdit.esriTOCControlManual;
}
Private Sub MapViewer_Load(ByVal sender As System.Object, ByVal e As System.EventArgs) Handles MyBase.Load
    'Set label editing to manual.
    AxTOCControl1.LabelEdit=esriTOCControlEdit.esriTOCControlManual
End Sub
- Display the form in design mode, select axTOCControl1 from the Properties window, and display the TOCControl events.
- Double-click OnEndLabelEdit to add an event handler to the code window.
- Add the following code example to the TOCControl_OnEndLabelEdit event:
private void axTOCControl1_OnEndLabelEdit(object sender,
    ITOCControlEvents_OnEndLabelEditEvent e)
{
    //If the new label is an empty string, prevent the edit.
    if (e.newLabel.Trim() == "")
        e.canEdit=false;
}
Private Sub AxTOCControl1_OnEndLabelEdit(ByVal sender As System.Object, ByVal e As ESRI.ArcGIS.Controls.ITOCControlEvents_OnEndLabelEditEvent) Handles AxTOCControl1.OnEndLabelEdit
    'If the new label is an empty string, prevent the edit.
    If e.newLabel.Trim="" Then e.canEdit=False
End Sub
- Build and run the application.
- To edit a map, layer, heading, or legend class label in the TOCControl, click it once, then click it a second time to invoke label editing. Try replacing the label with an empty string. Press Esc any time during the edit to cancel it. See the following screen shot:

Drawing shapes on the MapControl
To use the MapControl as an overview window and draw on its display the current extent of the focus map in the PageLayoutControl, perform the following steps. As you navigate around the data in the data frame of the PageLayoutControl, you will see the MapControl overview window update.
- Add the following member variables to the class below the pop-up menu variable:
public partial class MapViewer: Form
{
    //The envelope drawn on the MapControl.
    private IEnvelope m_Envelope;
    //The symbol used to draw the envelope on the MapControl.
    private Object m_FillSymbol;
    //The PageLayoutControl's focus map events.
    private ITransformEvents_Event m_transformEvents;
    private ITransformEvents_VisibleBoundsUpdatedEventHandler visBoundsUpdatedE;
}
Public Class MapViewer

    'The envelope drawn on the MapControl.
    Private m_pEnvelope As IEnvelope
    'The symbol used to draw the envelope on the MapControl.
    Private m_pFillSymbol As ISimpleFillSymbol
    'The PageLayoutControl's focus map events.
    Private m_pTransformEvents As ITransformEvents_Event
    Private visBoundsUpdatedE As ITransformEvents_VisibleBoundsUpdatedEventHandler
End Class
The variable declared as visBoundsUpdatedE is a delegate. A delegate is a class that can hold a reference to a specific method and link it to a specific event. The linking process between the event and the method is sometimes known in .NET as wiring.
- Create a function called CreateOverviewSymbol. This is where you create the symbol used in the MapControl to represent the extent of the data in the focus map of the PageLayoutControl. Add the following code example to the function:
private void CreateOverviewSymbol()
{
    //Get the IRGBColor interface.
    IRgbColor color=new RgbColorClass();
    //Set the color properties.
    color.RGB=255;
    //Get the ILine symbol interface.
    ILineSymbol outline=new SimpleLineSymbolClass();
    //Set the line symbol properties.
    outline.Width=1.5;
    outline.Color=color;
    //Get the IFillSymbol interface.
    ISimpleFillSymbol simpleFillSymbol=new SimpleFillSymbolClass();
    //Set the fill symbol properties.
    simpleFillSymbol.Outline=outline;
    simpleFillSymbol.Style=esriSimpleFillStyle.esriSFSHollow;
    m_FillSymbol=simpleFillSymbol;
}
Private Sub CreateOverviewSymbol()
    'Get the IRGBColor interface.
    Dim pColor As IRgbColor
    pColor=New RgbColorClass
    'Set the color properties.
    pColor.RGB=RGB(255, 0, 0)
    'Get the ILine symbol interface.
    Dim pOutline As ILineSymbol
    pOutline=New SimpleLineSymbolClass
    'Set the line symbol properties.
    pOutline.Width=1.5
    pOutline.Color=pColor
    'Get the ISimpleFillSymbol interface.
    m_pFillSymbol=New SimpleFillSymbolClass
    'Set the fill symbol properties.
    m_pFillSymbol.Outline=pOutline
    m_pFillSymbol.Style=esriSimpleFillStyle.esriSFSHollow
End Sub
- Call the CreateOverviewSymbol function from the beginning of the Form_Load event. See the following code example:
private void MapViewer_Load(object sender, EventArgs e)
{
    //Create the symbol used on the MapControl.
    CreateOverviewSymbol();
}
Private Sub MapViewer_Load(ByVal sender As System.Object, ByVal e As System.EventArgs) Handles MyBase.Load
    'Create the symbol used on the MapControl.
    CreateOverviewSymbol()
End Sub
- Add the following OnVisibleBoundsUpdated function. This function will be linked to an event raised when the extent of the map is changed and is used to set the envelope to the new visible bounds of the map. By refreshing the MapControl, you force it to redraw the shape on its display.
private void OnVisibleBoundsUpdated(IDisplayTransformation sender, bool sizeChanged)
{
    //Set the extent to the new visible extent.
    m_Envelope=sender.VisibleBounds;
    //Refresh the MapControl's foreground phase.
    axMapControl1.ActiveView.PartialRefresh(esriViewDrawPhase.esriViewForeground,
        null, null);
}
Private Sub OnVisibleBoundsUpdated(ByVal sender As IDisplayTransformation, ByVal sizeChanged As Boolean)
    'Set the extent to the new visible extent.
    m_pEnvelope=sender.VisibleBounds
    'Refresh the MapControl's foreground phase.
    AxMapControl1.ActiveView.PartialRefresh(esriViewDrawPhase.esriViewForeground, Nothing, Nothing)
End Sub
- The default event interface of the PageLayoutControl is IPageLayoutControlEvents. These events do not indicate when the extent of the map in a data frame changes. To enable this functionality, use the ITransformEvents interface of the PageLayoutControl's focus map. Add the following code example to the PageLayoutControl_OnPageLayoutReplaced event handler before the load document code:
private void axPageLayoutControl1_OnPageLayoutReplaced(object sender,
    IPageLayoutControlEvents_OnPageLayoutReplacedEvent e)
{
    //Get the IActiveView of the focus map in the PageLayoutControl.
    IActiveView activeView=axPageLayoutControl1.ActiveView.FocusMap as IActiveView;
    //Trap the ITranformEvents of the PageLayoutControl's focus map.
    visBoundsUpdatedE=new ITransformEvents_VisibleBoundsUpdatedEventHandler
        (OnVisibleBoundsUpdated);
    IDisplayTransformation displayTransformation =
        activeView.ScreenDisplay.DisplayTransformation;
    //Start listening to the transform events interface.
    m_transformEvents=(ITransformEvents_Event)displayTransformation;
    //Start listening to the VisibleBoundsUpdated method on ITransformEvents interface.
    m_transformEvents.VisibleBoundsUpdated += visBoundsUpdatedE;
    //Get the extent of the focus map.
    m_Envelope=activeView.Extent;

    //Load the same pre-authored map document into the MapControl.
}
Private Sub AxPageLayoutControl1_OnPageLayoutReplaced(ByVal sender As System.Object, ByVal e As ESRI.ArcGIS.Controls.IPageLayoutControlEvents_OnPageLayoutReplacedEvent) Handles AxPageLayoutControl1.OnPageLayoutReplaced
    'Get the IActiveView of the focus map in the PageLayoutControl.
    Dim activeView As IActiveView=AxPageLayoutControl1.ActiveView.FocusMap
    'Trap the ITranformEvents of the PageLayoutControl's focus map.
    visBoundsUpdatedE=New ITransformEvents_VisibleBoundsUpdatedEventHandler(AddressOf OnVisibleBoundsUpdated)
    'Start listening to the transform events interface.
    m_pTransformEvents=activeView.ScreenDisplay.DisplayTransformation
    'Start listening to the VisibleBoundsUpdated method on ITransformEvents interface.
    AddHandler (m_pTransformEvents.VisibleBoundsUpdated), visBoundsUpdatedE
    'Get the extent of the focus map.
    m_pEnvelope=activeView.Extent

    'Load the same pre-authored map document into the MapControl.
End Sub
- Display the form in design mode and select axMapControl1 from the Properties window and display the MapControl events.
- Double-click OnAfterDraw to add an event handler to the code window.
- Add the following code example to the MapControl_OnAfterDraw event handler to draw an envelope using the symbol you created previously onto the MapControl's display:
private void axMapControl1_OnAfterDraw(object sender,
    IMapControlEvents2_OnAfterDrawEvent e)
{
    if (m_Envelope == null)
        return ;

    //If the foreground phase has drawn.
    esriViewDrawPhase viewDrawPhase=(esriViewDrawPhase)e.viewDrawPhase;
    if (viewDrawPhase == esriViewDrawPhase.esriViewForeground)
    {
        IGeometry geometry=m_Envelope;
        axMapControl1.DrawShape(geometry, ref m_FillSymbol);
    }
}
Private Sub AxMapControl1_OnAfterDraw(ByVal sender As System.Object, ByVal e As ESRI.ArcGIS.Controls.IMapControlEvents2_OnAfterDrawEvent) Handles AxMapControl1.OnAfterDraw
    If m_pEnvelope Is Nothing Then Exit Sub

    'If the foreground phase has drawn.
    Dim pViewDrawPhase As esriViewDrawPhase
    pViewDrawPhase=e.viewDrawPhase
    If pViewDrawPhase=esriViewDrawPhase.esriViewForeground Then
        'Draw the shape on the MapControl
        AxMapControl1.DrawShape(m_pEnvelope, m_pFillSymbol)
    End If
End Sub
- Build and run the application.
- Use the map navigation tools that you added previously to change the extent of the focus map in the PageLayoutControl. The new extent is drawn on the MapControl. See the following screen shot:

Navigating around the focus map using the map navigation tools changes the extent of the focus map in the PageLayoutControl and causes the MapControl to update. Navigating around the page layout with the page layout navigation tools changes the extent of the page layout (not the extent of the focus map in the PageLayoutControl), so the MapControl will not update.
Creating a custom tool
Creating custom commands and tools to work with the MapControl and PageLayoutControl is similar to creating commands for the ArcMap application. To create a custom tool that adds a text element containing the date to the PageLayoutControl at the location of a mouse click, perform the following steps. In these steps, you will create the command to work with the MapControl and ToolbarControl, as well as the PageLayoutControl.
- Choose Add, then New Project from the File menu.
- Choose the Class Library template from the ArcGIS Engine project types, name the project Commands, and click OK.
- In the ArcGIS Project Wizard, double-click ESRI.ArcGIS.Carto, ESRI.ArcGIS.Display, and ESRI.ArcGIS.Geometry to add them to the selected assemblies, then click Finish.
- Delete Class1 from the Commands project.
- Choose Add New Item from the Project menu to add a new item to the Commands project.
- Choose the Base Tool template from the ArcGIS Engine category on the Add New Item dialog box.
- Name the tool AddDateTool and click Add to add it to the project.
- Click the ArcMap, MapControl, or PageLayoutControl tool from the ArcGIS New Item Wizard Options dialog box, then click OK.
The AddDateTool class inherits from the ESRI BaseTool abstract class. Abstract classes are classes that cannot be instantiated and frequently contain only partial implementation code or no implementation code. They are closely related to interfaces; however, they differ significantly from interfaces in that a class might implement any number of interfaces but it can inherit from only one abstract class. Inheriting the ESRI BaseCommand and BaseTool abstract classes will allow you to create commands and tools quicker and easier than directly implementing the esriSystemUI ICommand and ITool interfaces.
The sealed class modifier in C# and the NotInheritable modifier in VB .NET state that a class cannot be inherited. As this class is not designed for this purpose, it is prudent to add this modifier to prevent other classes from inheriting this class.
- Add the following additional using directives or Imports statements to the class:
using ESRI.ArcGIS.Carto;
using ESRI.ArcGIS.Display;
using ESRI.ArcGIS.Geometry;
Imports ESRI.ArcGIS.Carto
Imports ESRI.ArcGIS.Display
Imports ESRI.ArcGIS.Geometry
- Update the code in the AddDateTool class constructor as shown in the following code example:
The class constructor is a method that is called when the class is created. It can be used to set up members of the class. In C#, the constructor method has the same name as the class. It differs from other methods in that it has no return type.
Instead of implementing the Bitmap, Caption, Category, Name, Message, and ToolTip methods individually, you can set the values that should be returned from these methods and rely on the BaseTool class to provide the implementation for these methods. The other members will be left to return the default values as implemented by the BaseTool class.
public AddDateTool()
{
    base.m_category="CustomMapViewer";
    base.m_caption="Add Date";
    base.m_message="Adds a date element to the active view";
    base.m_toolTip="Add Date";
    base.m_name="CustomMapViewer_AddDateTool";
    try
    {
        string bitmapResourceName=GetType().Name + ".bmp";
        base.m_bitmap=new Bitmap(GetType(), bitmapResourceName);
        base.m_cursor=new Cursor(GetType(), GetType().Name + ".cur");
    }
    catch (Exception ex)
    {
        System.Diagnostics.Trace.WriteLine(ex.Message, "Invalid Bitmap");
    }
}
Public Sub New()
    MyBase.New()
    MyBase.m_category="CustomMapViewer"
    MyBase.m_caption="Add Date"
    MyBase.m_message="Adds a date element to the active view"
    MyBase.m_toolTip="Add Date"
    MyBase.m_name="CustomMapViewer_AddDateTool"
    Try
    Dim bitmapResourceName As String=Me.GetType().Name + ".bmp"
    MyBase.m_bitmap=New Bitmap(Me.GetType(), bitmapResourceName)
    MyBase.m_cursor=New Cursor(Me.GetType(), Me.GetType().Name + ".cur")
    Catch ex As Exception
    System.Diagnostics.Trace.WriteLine(ex.Message, "Invalid Bitmap")
    End Try
End Sub
- Navigate to the overridden OnCreate method and review the code.
The ICommand.OnCreate method is passed a handle or hook to the application that the command works with. In this case, it can be a MapControl, PageLayoutControl, ToolbarControl, or the ArcMap application. Rather than adding code to the OnCreate method to determine the type of hook that is being passed to the command, the HookHelper is used to handle this. A command or tool needs to know how to handle the hook it gets passed, so a check is needed to determine the type of ArcGIS Engine control that has been passed. The HookHelper is used to hold the hook and return the ActiveView regardless of the type of hook (in this case a MapControl, PageLayoutControl, ToolbarControl, or ArcMap).
- Navigate to the overridden OnMouseDown event and add the following code example:
public override void OnMouseDown(int Button, int Shift, int X, int Y)
{
    //Get the active view.
    IActiveView activeView=m_hookHelper.ActiveView;

    //Create a text element.
    ITextElement textElement=new TextElementClass();
    //Create a text symbol.
    ITextSymbol textSymbol=new TextSymbolClass();
    textSymbol.Size=25;

    //Set the text element properties.
    textElement.Symbol=textSymbol;
    textElement.Text=DateTime.Now.ToShortDateString();

    //Query interface (QI) for IElement.
    IElement element=(IElement)textElement;
    //Create a point.
    IPoint point=new PointClass();
    point=activeView.ScreenDisplay.DisplayTransformation.ToMapPoint(X, Y);
    //Set the element's geometry.
    element.Geometry=point;

    //Add the element to the graphics container.
    activeView.GraphicsContainer.AddElement(element, 0);
    //Refresh the graphics.
    activeView.PartialRefresh(esriViewDrawPhase.esriViewGraphics, null, null);
}
Public Overrides Sub OnMouseDown(ByVal Button As Integer, ByVal Shift As Integer, ByVal X As Integer, ByVal Y As Integer)
'Get the active view.
Dim pActiveView As IActiveView=m_hookHelper.ActiveView

'Create a text element.
Dim pTextElement As ITextElement=New TextElementClass
'Create a text symbol.
Dim pTextSymbol As ITextSymbol=New TextSymbolClass
pTextSymbol.Size=25

'Set the text element properties.
pTextElement.Symbol=pTextSymbol
pTextElement.Text=Date.Now.ToShortDateString

'Query interface (QI) for IElement.
Dim pElement As IElement
pElement=pTextElement
'Create a point.
Dim pPoint As IPoint
pPoint=pActiveView.ScreenDisplay.DisplayTransformation.ToMapPoint(X, Y)
'Set the element's geometry.
pElement.Geometry=pPoint

'Add the element to the graphics container.
pActiveView.GraphicsContainer.AddElement(pTextElement, 0)
'Refresh the graphics.
pActiveView.PartialRefresh(esriViewDrawPhase.esriViewGraphics, Nothing, Nothing)
End Sub
ArcGIS Engine expects a custom command or tool to be a COM class; therefore, the .NET class you created must be exposed as a COM class by creating a COM callable wrapper for it. The BaseTool has already provided the attributes and globally unique identifiers (GUIDs) required by COM in the class.
The Commands project properties have also been automatically amended to set Register for COM Interop to true. Setting the Register for COM Interop property to true invokes the Assembly Registration tool (Regasm.exe), which adds the information about the class to the registry that a COM client expects to find. This enables commands to be added to a Toolbar control by selecting the .tlb file from the Add From File dialog box on the Toolbar control Customize dialog box. Back at ArcGIS 10, a new registration utility (ESRIRegAsm.exe) replaced Regasm.exe. For details, refer to the topics ESRIRegAsm utility and How to register COM components.
Visual Studio .NET provides the ability to specify functions that execute when an assembly exposed for COM interop is registered and unregistered on a system. This allows you to register your class in a component category that the Customize dialog box will look for. The BaseTool has already provided these COM Registration Functions in the class and will register the tool with the ESRI Controls Commands and ESRI Mx Commands component categories. The ComVisible attribute is set to false to ensure that this method cannot be called directly by a COM client. It does not affect the method being called when the assembly is registered with COM.
- Build the Commands project.
- In the Controls Windows Application project that you created at the beginning of this scenario, add the following code example before the ToolbarPalette code:
private void MapViewer_Load(object sender, EventArgs e)
{
    //Add map inquiry commands.

    //Add custom AddDateTool.
    axToolbarControl1.AddItem("Commands.AddDateTool",  - 1,  - 1, false, 0,
        esriCommandStyles.esriCommandStyleIconAndText);

    //Create a ToolbarPalette.
}
Private Sub MapViewer_Load(ByVal sender As System.Object, ByVal e As System.EventArgs) Handles MyBase.Load
    'Add map inquiry commands.

    'Add custom AddDateTool.
    AxToolbarControl1.AddItem("Commands.AddDateTool", -1, -1, False, 0, esriCommandStyles.esriCommandStyleIconAndText)

    'Create a ToolbarPalette.
End Sub
- Build and run the Controls project. See the following screen shot:

Customizing the ToolbarControl
In addition to adding ArcGIS Engine commands and tools to the ToolbarControl in the Form_Load event, you can also add them by customizing the ToolbarControl at run time using the CustomizeDialog. To do this, you will place the ToolbarControl in customize mode and display the CustomizeDialog, as shown in the following steps:
- Add the following member variables to the class:
public partial class MapViewer: Form
{
    //The CustomizeDialog used by the ToolbarControl.
    private ICustomizeDialog m_CustomizeDialog;
    //The CustomizeDialog start event.
    private ICustomizeDialogEvents_OnStartDialogEventHandler startDialogE;
    //The CustomizeDialog close event.
    private ICustomizeDialogEvents_OnCloseDialogEventHandler closeDialogE;
}
Public Class MapViewer
    'The CustomizeDialog used by the ToolbarControl.
    Private m_pCustomizeDialog As ICustomizeDialog
    'The CustomizeDialog start event.
    Private startDialogE As ICustomizeDialogEvents_OnStartDialogEventHandler
    'The CustomizeDialog close event.
    Private closeDialogE As ICustomizeDialogEvents_OnCloseDialogEventHandler
End Class
- Create a function called CreateCustomizeDialog. This is where you will create the Customize dialog box by adding the following code example to the function:
private void CreateCustomizeDialog()
{
    //Create a Customize dialog box.
    m_CustomizeDialog=new CustomizeDialogClass();
    //Set the title.
    m_CustomizeDialog.DialogTitle="Customize ToolbarControl Items";
    //Show the Add from File button.
    m_CustomizeDialog.ShowAddFromFile=true;
    //Set the ToolbarControl that new items will be added to.
    m_CustomizeDialog.SetDoubleClickDestination(axToolbarControl1);

    //Set the Customize dialog box events.
    startDialogE=new ICustomizeDialogEvents_OnStartDialogEventHandler
        (OnStartDialog);
    ((ICustomizeDialogEvents_Event)m_CustomizeDialog).OnStartDialog += startDialogE;
    closeDialogE=new ICustomizeDialogEvents_OnCloseDialogEventHandler
        (OnCloseDialog);
    ((ICustomizeDialogEvents_Event)m_CustomizeDialog).OnCloseDialog += closeDialogE;
}
Private Sub CreateCustomizeDialog()
    'Create a Customize dialog box.
    m_pCustomizeDialog=New CustomizeDialogClass()
    'Set the title.
    m_pCustomizeDialog.DialogTitle="Customize ToolbarControl Items"
    'Show the Add from File button.
    m_pCustomizeDialog.ShowAddFromFile=True
    'Set the ToolbarControl that new items will be added to.
    m_pCustomizeDialog.SetDoubleClickDestination(AxToolbarControl1)

    'Set the Customize dialog box events.
    startDialogE=New ICustomizeDialogEvents_OnStartDialogEventHandler(AddressOf OnStartDialog)
    AddHandler CType(m_pCustomizeDialog, ICustomizeDialogEvents_Event).OnStartDialog, startDialogE
    closeDialogE=New ICustomizeDialogEvents_OnCloseDialogEventHandler(AddressOf OnCloseDialog)
    AddHandler CType(m_pCustomizeDialog, ICustomizeDialogEvents_Event).OnCloseDialog, closeDialogE
End Sub
- Call the CreateCustomizeDialog function from the beginning of the Form_Load event. See the following code example:
private void MapViewer_Load(object sender, EventArgs e)
{
    //Create the Customize dialog box for the ToolbarControl.
    CreateCustomizeDialog();

    //Create the symbol used on the MapControl.
}
Private Sub MapViewer_Load(ByVal sender As System.Object, ByVal e As System.EventArgs) Handles MyBase.Load
    'Create the Customize dialog box for the ToolbarControl.
    CreateCustomizeDialog()

    'Create the symbol used on the MapControl.
End Sub
- Add a check box to the form, name it chkCustomize, and give it the caption of Customize.
- Display the form in design mode, select chkCustomize from the Properties window, and display the chkCustomize events.
- Double-click CheckedChanged to add an event handler to the code window.
- Add the following code example to the chkCustomize_CheckedChanged event:
private void chkCustomize_CheckedChanged(object sender, EventArgs e)
{
    //Show or hide the Customize dialog box.
    if (chkCustomize.Checked == false)
        m_CustomizeDialog.CloseDialog();
    else
        m_CustomizeDialog.StartDialog(axToolbarControl1.hWnd);
}
Private Sub chkCustomize_CheckedChanged(ByVal sender As System.Object, ByVal e As System.EventArgs) Handles chkCustomize.CheckedChanged
    'Show or hide the Customize dialog box.
    If chkCustomize.Checked=False Then
        m_pCustomizeDialog.CloseDialog()
    Else
        m_pCustomizeDialog.StartDialog(AxToolbarControl1.hWnd)
    End If
End Sub
- Add the following OnStartDialog and OnCloseDialog event handlers. These functions will be wired to events raised when the Customize dialog box is opened or closed.
private void OnStartDialog()
{
    axToolbarControl1.Customize=true;
}

private void OnCloseDialog()
{
    axToolbarControl1.Customize=false;
    chkCustomize.Checked=false;
}
Private Sub OnStartDialog()
    AxToolbarControl1.Customize=True
End Sub

Private Sub OnCloseDialog()
    AxToolbarControl1.Customize=False
    chkCustomize.Checked=False
End Sub
- Build and run the application.
- Check the Customize control to put the ToolbarControl into customize mode and to open the Customize dialog box.
- On the Commands tab, select the Graphic Element category, and double-click the Select Elements command to add it to the ToolbarControl.
- Right-click an item on the ToolbarControl to adjust its appearance in terms of style and grouping. See the following screen shot:

- Stop customizing the application, and use the select tool to move the text element containing the date.
Saving and loading ToolbarControl items
The contents of a ToolbarControl can be persisted into a user's profile when an application closes to preserve any customizations made to the ToolbarControl by the end user. An application can load the persisted contents back onto the ToolbarControl when the application starts.
To persist the contents of the ToolbarControl into a file located in the same directory as the applications executing assembly, follow these steps:
- Create a function called SaveToolbarControlItems. This is where you will persist the contents of the ToolbarControl by adding the following code example to the function:
private void SaveToolbarControlItems(string filePath)
{
    //Create a MemoryBlobStream.
    IBlobStream blobStream=new MemoryBlobStreamClass();
    //Get the IStream interface.
    IStream stream=blobStream;
    //Save the ToolbarControl into the stream.
    axToolbarControl1.SaveItems(stream);
    //Save the stream to a file.
    blobStream.SaveToFile(filePath);
}
Private Sub SaveToolbarControlItems(ByVal filePath)
    'Create a MemoryBlobStream.
    Dim blobStream As IBlobStream
    blobStream=New MemoryBlobStreamClass
    'Get the IStream interface.
    Dim stream As IStream
    stream=blobStream
    'Save the ToolbarControl into the stream.
    AxToolbarControl1.SaveItems(stream)
    'Save the stream to a file.
    blobStream.SaveToFile(filePath)
End Sub
- Create a function called LoadToolbarControlItems. This is where you will load the persisted contents back onto the ToolbarControl by adding the following code example to the function:
private void LoadToolbarControlItems(string filePath)
{
    //Create a MemoryBlobStream.
    IBlobStream blobStream=new MemoryBlobStreamClass();
    //Get the IStream interface.
    IStream stream=blobStream;
    //Load the stream from the file.
    blobStream.LoadFromFile(filePath);
    //Load the stream into the ToolbarControl.
    axToolbarControl1.LoadItems(stream);
}
Private Sub LoadToolbarControlItems(ByVal filePath)
    'Create a MemoryBlobStream.
    Dim blobStream As IBlobStream
    blobStream=New MemoryBlobStreamClass
    'Get the IStream interface.
    Dim stream As IStream
    stream=blobStream
    'Load the stream from the file.
    blobStream.LoadFromFile(filePath)
    'Load the stream into the ToolbarControl.
    AxToolbarControl1.LoadItems(stream)
End Sub
- Display the form in design mode, select the form from the Properties window, and display the form events.
- Double-click the FormClosing event to add an event handler to the code window.
- In the FormClosing event, add the following code example to persist the contents of the ToolbarControl into a file at the same location as the executing assembly (you might need to substitute "Controls.exe" with the name of your executable):
private void MapViewer_FormClosing(object sender, FormClosingEventArgs e)
{
    //Get file name to persist the ToolbarControl.
    String filePath=System.Reflection.Assembly.GetExecutingAssembly()
        .Location.Replace("Controls.exe", "") + @"\PersistedItems.txt";
    //Persist ToolbarControl contents.
    SaveToolbarControlItems(filePath);
}
Private Sub MapViewer_FormClosing(ByVal sender As System.Object, ByVal e As System.Windows.Forms.FormClosingEventArgs) Handles MyBase.FormClosing
    'Get file name to persist the ToolbarControl.
    Dim filePath As String
    filePath=System.Reflection.Assembly.GetExecutingAssembly.Location.Replace("Controls.exe", "") & "\PersistedItems.txt"
    'Persist ToolbarControl contents.
    SaveToolbarControlItems(filePath)
End Sub
- Update the code to add items to the ToolbarControl in the Form_Load event as shown in the following code example (you might need to substitute "Controls.exe" with the name of your executable):
//Get file name used to persist the ToolbarControl.
String filePath=System.Reflection.Assembly.GetExecutingAssembly().Location.Replace
    ("Controls.exe", "") + @"\PersistedItems.txt";
if (System.IO.File.Exists(filePath))
    LoadToolbarControlItems(filePath);
else
{
    //Add generic commands.
    axToolbarControl1.AddItem("esriControls.ControlsOpenDocCommand",  - 1,  - 1,
        false, 0, esriCommandStyles.esriCommandStyleIconOnly);
    axToolbarControl1.AddItem("esriControls.ControlsAddDataCommand",  - 1,  - 1,
        false, 0, esriCommandStyles.esriCommandStyleIconOnly);
    //Add page layout navigation commands.
    axToolbarControl1.AddItem("esriControls.ControlsPageZoomInTool",  - 1,  - 1,
        true, 0, esriCommandStyles.esriCommandStyleIconOnly);
    axToolbarControl1.AddItem("esriControls.ControlsPageZoomOutTool",  - 1,  - 1,
        false, 0, esriCommandStyles.esriCommandStyleIconOnly);
    axToolbarControl1.AddItem("esriControls.ControlsPagePanTool",  - 1,  - 1, false,
        0, esriCommandStyles.esriCommandStyleIconOnly);
    axToolbarControl1.AddItem("esriControls.ControlsPageZoomWholePageCommand",  - 1,
        - 1, false, 0, esriCommandStyles.esriCommandStyleIconOnly);
    //Add map navigation commands.
    axToolbarControl1.AddItem("esriControls.ControlsMapZoomInTool",  - 1,  - 1, true,
        0, esriCommandStyles.esriCommandStyleIconOnly);
    axToolbarControl1.AddItem("esriControls.ControlsMapZoomOutTool",  - 1,  - 1,
        false, 0, esriCommandStyles.esriCommandStyleIconOnly);
    axToolbarControl1.AddItem("esriControls.ControlsMapPanTool",  - 1,  - 1, false,
        0, esriCommandStyles.esriCommandStyleIconOnly);
    axToolbarControl1.AddItem("esriControls.ControlsMapFullExtentCommand",  - 1,  -
        1, false, 0, esriCommandStyles.esriCommandStyleIconOnly);
    axToolbarControl1.AddItem("esriControls.ControlsMapZoomToLastExtentBackCommand",
        - 1,  - 1, false, 0, esriCommandStyles.esriCommandStyleIconOnly);
    axToolbarControl1.AddItem(
        "esriControls.ControlsMapZoomToLastExtentForwardCommand",  - 1,  - 1, false,
        0, esriCommandStyles.esriCommandStyleIconOnly);
    //Add map inquiry commands.
    axToolbarControl1.AddItem("esriControls.ControlsMapIdentifyTool",  - 1,  - 1,
        true, 0, esriCommandStyles.esriCommandStyleIconOnly);
    axToolbarControl1.AddItem("esriControls.ControlsMapFindCommand",  - 1,  - 1,
        false, 0, esriCommandStyles.esriCommandStyleIconOnly);
    axToolbarControl1.AddItem("esriControls.ControlsMapMeasureTool",  - 1,  - 1,
        false, 0, esriCommandStyles.esriCommandStyleIconOnly);
    //Add custom AddDateTool.
    axToolbarControl1.AddItem("Commands.AddDateTool",  - 1,  - 1, false, 0,
        esriCommandStyles.esriCommandStyleIconAndText);

    //Create a ToolbarPalette.
    IToolbarPalette toolbarPalette=new ToolbarPaletteClass();
    //Add commands and tools to the ToolbarPalette.
    toolbarPalette.AddItem("esriControls.ControlsNewMarkerTool",  - 1,  - 1);
    toolbarPalette.AddItem("esriControls.ControlsNewLineTool",  - 1,  - 1);
    toolbarPalette.AddItem("esriControls.ControlsNewCircleTool",  - 1,  - 1);
    toolbarPalette.AddItem("esriControls.ControlsNewEllipseTool",  - 1,  - 1);
    toolbarPalette.AddItem("esriControls.ControlsNewRectangleTool",  - 1,  - 1);
    toolbarPalette.AddItem("esriControls.ControlsNewPolygonTool",  - 1,  - 1);
    //Add the ToolbarPalette to the ToolbarControl.
    axToolbarControl1.AddItem(toolbarPalette, 0,  - 1, false, 0,
        esriCommandStyles.esriCommandStyleIconOnly);
}
'Get file name used to persist the ToolbarControl.
Dim filePath As String
filePath=System.Reflection.Assembly.GetExecutingAssembly.Location.Replace("Controls.exe", "") & "\PersistedItems.txt"
If System.IO.File.Exists(filePath) Then
    LoadToolbarControlItems(filePath)
Else
    'Add generic commands.
    AxToolbarControl1.AddItem("esriControls.ControlsOpenDocCommand", -1, -1, False, 0, esriCommandStyles.esriCommandStyleIconOnly)
    AxToolbarControl1.AddItem("esriControls.ControlsAddDataCommand", -1, -1, False, 0, esriCommandStyles.esriCommandStyleIconOnly)
    'Add page layout navigation commands.
    AxToolbarControl1.AddItem("esriControls.ControlsPageZoomInTool", -1, -1, True, 0, esriCommandStyles.esriCommandStyleIconOnly)
    AxToolbarControl1.AddItem("esriControls.ControlsPageZoomOutTool", -1, -1, False, 0, esriCommandStyles.esriCommandStyleIconOnly)
    AxToolbarControl1.AddItem("esriControls.ControlsPagePanTool", -1, -1, False, 0, esriCommandStyles.esriCommandStyleIconOnly)
    AxToolbarControl1.AddItem("esriControls.ControlsPageZoomWholePageCommand", -1, -1, False, 0, esriCommandStyles.esriCommandStyleIconOnly)
    'Add map navigation commands.
    AxToolbarControl1.AddItem("esriControls.ControlsMapZoomInTool", -1, -1, True, 0, esriCommandStyles.esriCommandStyleIconOnly)
    AxToolbarControl1.AddItem("esriControls.ControlsMapZoomOutTool", -1, -1, False, 0, esriCommandStyles.esriCommandStyleIconOnly)
    AxToolbarControl1.AddItem("esriControls.ControlsMapPanTool", -1, -1, False, 0, esriCommandStyles.esriCommandStyleIconOnly)
    AxToolbarControl1.AddItem("esriControls.ControlsMapFullExtentCommand", -1, -1, False, 0, esriCommandStyles.esriCommandStyleIconOnly)
    AxToolbarControl1.AddItem("esriControls.ControlsMapZoomToLastExtentBackCommand", -1, -1, False, 0, esriCommandStyles.esriCommandStyleIconOnly)
    AxToolbarControl1.AddItem("esriControls.ControlsMapZoomToLastExtentForwardCommand", -1, -1, False, 0, esriCommandStyles.esriCommandStyleIconOnly)
    'Add map inquiry commands.
    AxToolbarControl1.AddItem("esriControls.ControlsMapIdentifyTool", -1, -1, True, 0, esriCommandStyles.esriCommandStyleIconOnly)
    AxToolbarControl1.AddItem("esriControls.ControlsMapFindCommand", -1, -1, False, 0, esriCommandStyles.esriCommandStyleIconOnly)
    AxToolbarControl1.AddItem("esriControls.ControlsMapMeasureTool", -1, -1, False, 0, esriCommandStyles.esriCommandStyleIconOnly)
    'Add custom AddDateTool.
    AxToolbarControl1.AddItem("Commands.AddDateTool", -1, -1, False, 0, esriCommandStyles.esriCommandStyleIconAndText)

    'Create a ToolbarPalette.
    Dim pToolbarPalette As IToolbarPalette=New ToolbarPaletteClass()
    'Add commands and tools to the ToolbarPalette.
    pToolbarPalette.AddItem("esriControls.ControlsNewMarkerTool", -1, -1)
    pToolbarPalette.AddItem("esriControls.ControlsNewLineTool", -1, -1)
    pToolbarPalette.AddItem("esriControls.ControlsNewCircleTool", -1, -1)
    pToolbarPalette.AddItem("esriControls.ControlsNewEllipseTool", -1, -1)
    pToolbarPalette.AddItem("esriControls.ControlsNewRectangleTool", -1, -1)
    pToolbarPalette.AddItem("esriControls.ControlsNewPolygonTool", -1, -1)
    'Add the ToolbarPalette to the ToolbarControl.
    AxToolbarControl1.AddItem(pToolbarPalette, 0, -1, False, 0, esriCommandStyles.esriCommandStyleIconOnly)
End If
- Build and run the application and customize the ToolbarControl.
- Stop running the application.
- Restart the application. The customizations you made to the ToolbarControl are reflected in the application.
Printing the page layout
The PageLayoutControl encapsulates the page layout that manages the page that can be sent to any available printer. To add code to allow users to send output to the system's default printer, follow these steps:
- Display the form in design mode and select the MenuStrip control on the form.
- Click Type Here and type File to create a File menu.
- On the File menu, click Type Here and type Printto create a menu item.
- Double-click the Print menu item to add an event handler to the code window.
- In the PrintToolStripMenuItem_Click event, add the following code example to send the page to the printer:
private void printToolStripMenuItem_Click(object sender, EventArgs e)
{
    //Exit if there is no system default printer.
    if (axPageLayoutControl1.Printer == null)
    {
        MessageBox.Show("Unable to print!", "No default printer");
        return ;
    }

    //Set printer papers orientation to that of the page.
    axPageLayoutControl1.Printer.Paper.Orientation =
        axPageLayoutControl1.Page.Orientation;
    //Scale to the page.
    axPageLayoutControl1.Page.PageToPrinterMapping =
        esriPageToPrinterMapping.esriPageMappingScale;
    //Send the page layout to the printer.
    axPageLayoutControl1.PrintPageLayout();
}
Private Sub PrintToolStripMenuItem_Click(ByVal sender As System.Object, ByVal e As System.EventArgs) Handles PrintToolStripMenuItem.Click
    'Exit if there is no system default printer.
    If AxPageLayoutControl1.Printer Is Nothing Then
        MessageBox.Show("Unable to print!", "No default printer")
        Exit Sub
    End If

    'Set printer papers orientation to that of the page.
    AxPageLayoutControl1.Printer.Paper.Orientation=AxPageLayoutControl1.Page.Orientation
    'Scale to the page.
    AxPageLayoutControl1.Page.PageToPrinterMapping=esriPageToPrinterMapping.esriPageMappingScale
    'Send the page layout to the printer.
    AxPageLayoutControl1.PrintPageLayout()
End Sub
- Build and run the application.
- Use the Print menu item to send output to the printer. See the following screen shot:

Deployment
Do the following to successfully deploy this application on a user's machine:
- The application's executable, .dll, and, optionally, .tlb files containing the custom command need to be deployed on the user's machine. The ESRI Assembly Registration tool (EsriRegAsm.exe) must be used to register the custom command for an ArcGIS product. For more information, see How to register COM components.
- The user's machine needs an installation of ArcGIS Engine Runtime and a standard ArcGIS Engine license.
- The user's machine needs an installation of Microsoft .NET Framework 4.5 or better.
Additional resources
The following resources can help you understand and apply the concepts and techniques discussed in this walkthrough:
- Additional documentation is available in the ArcObjects Software Development Kit (SDK) for the Microsoft .NET Framework. This includes component Help, object model diagrams (OMDs), and samples to help you get started.
- For Microsoft documentation regarding the Visual Studio .NET development environment, see the Microsoft Developer Network (MSDN) Web site.
- For the related sample see the MapViewerWalkthrough.
See Also:
How to create a MapControl applicationHow to register COM components
To use the code in this topic, reference the following assemblies in your Visual Studio project. In the code files, you will need using (C#) or Imports (VB .NET) directives for the corresponding namespaces (given in parenthesis below if different from the assembly name):
- ESRI.ArcGIS.ADF.Local
- ESRI.ArcGIS.AxControls
- ESRI.ArcGIS.Carto
- ESRI.ArcGIS.Controls
- ESRI.ArcGIS.Display
- ESRI.ArcGIS.Geometry
- ESRI.ArcGIS.Output
- ESRI.ArcGIS.System (ESRI.ArcGIS.esriSystem)
- ESRI.ArcGIS.SystemUI
- ESRI.ArcGIS.Version (ESRI.ArcGIS)
| Development licensing | Deployment licensing |
|---|---|
| Engine Developer Kit | Engine |
| ArcGIS for Desktop Basic | |
| ArcGIS for Desktop Standard | |
| ArcGIS for Desktop Advanced |