Data Reviewer のライセンスで利用可能。
ArcGIS Data Reviewer for Desktop contains more than 40 automated checks that can be configured to validate your data. Checks can be configured to run one at a time by choosing a check from the Select a Check drop-down list on the Data Reviewer toolbar.
Data Reviewer also offers the ability to configure and store multiple checks using batch jobs. The batch job can be thought of as a quality control model, a way to encapsulate and distribute quality control and validation information. The batch job allows users in different locations to utilize a consistent set of automated checks when validating their data. In this exercise, you'll learn how to create and run a batch job using the Batch Job Manager and Batch Validate tools.
Exercise 2a: Adding a check
Checks are configured in a batch job using the Batch Job Manager. You can create groups in which you can store checks that apply to different aspects of your database. For example, in one group, you can have checks that are used to validate the attributes for a specified feature class, and in a different group, you can have checks for validating the geometry of features.
In the data, both points and polygons are used to represent important facilities. Any time a point and polygon represent the same location, both features should have the same name. The Geometry on Geometry check will be configured to find a point that is within a polygon where the name of the point is different from the name of the polygon.
- Ensure that ArcMap is open and the Reviewer.mxd file has been loaded.
- Click the Reviewer Session Manager button
 on the Data Reviewer toolbar.
The Reviewer Session Manager dialog box appears.
- Make sure that Reviewer.gdb is set as the Reviewer workspace.
The Reviewer.gdb Reviewer workspace is located in the Data Reviewer directory where the ArcGIS Desktop tutorial data was installed.
- Click New next to the ID drop-down list.
- Type Exercise 2 in the Name text box.
- Click Start Session.
The button name changes to End Session.
- Click Close.
The Reviewer Session Manager dialog box closes, and the Reviewer tools use the current session when writing to the Reviewer table.
- Click the Reviewer Batch Job Manager button
 on the Data Reviewer toolbar.
The Reviewer Batch Job Manager dialog box appears.
- Right-click in the empty space in the upper box of the Reviewer Batch Job Manager dialog box and click New Group.
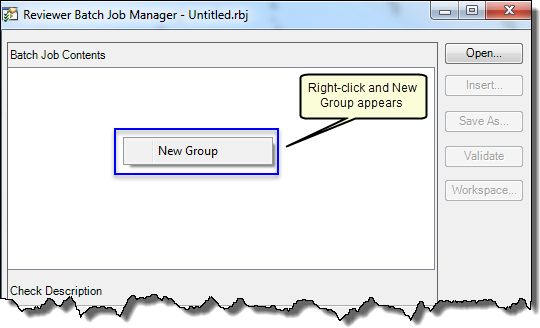
A node called Group 1 is added to the tree with the file name Untitled.rbj.
- Select the Group 1 node and press the F2 key.
- Type Geometry Checks for the new node name.
Notice that right after you make a change the batch job will have an asterisk after .rbj until it is saved.
- Right-click the Geometry Checks node and click Add Check > Feature on Feature Checks > Geometry on Geometry Check.
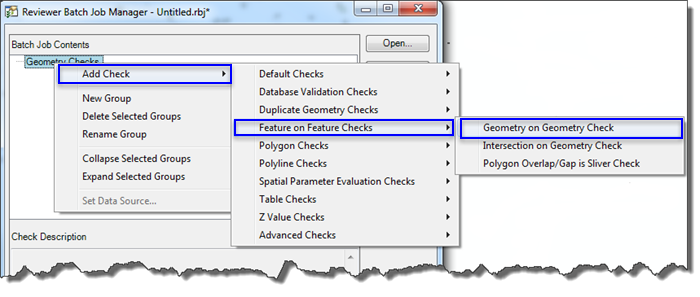
The Geometry on Geometry Check Properties dialog box appears.
- Type Point in landmark with different name in the Check Title text box.
- In the Feature Class 1 area of the dialog box, click the Feature Class/Subtype drop-down arrow and choose Schools.
The schools will be compared to the landmark areas to ensure the names are the same.
- In the Feature Class 2 area of the dialog box, click the Feature Class/Subtype drop-down arrow and choose LandmarkAreas.
The landmark areas and the school names will be compared to ensure they have the same name.
- Click the Type drop-down arrow in the Spatial Relation Check area and choose Within.
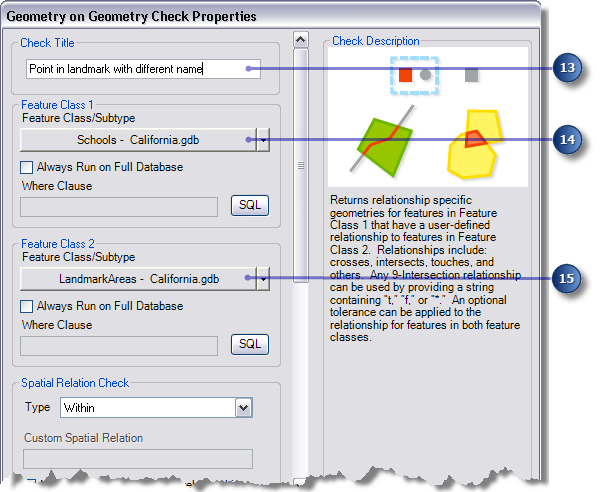
- On the Geometry on Geometry Check Properties dialog box, scroll down so you can see the rest of the properties.
- In the Attributes area of the dialog box, choose the Compare Attributes option.
- Click Select Attributes.
The Compare Attributes dialog box appears.
- Click the Data Source 1 Attribute drop-down arrow and choose NAME.
- Click the Operator drop-down arrow and choose <>.
- Click the Data Source 2 Attribute drop-down arrow and choose NAME.
- Click Add.
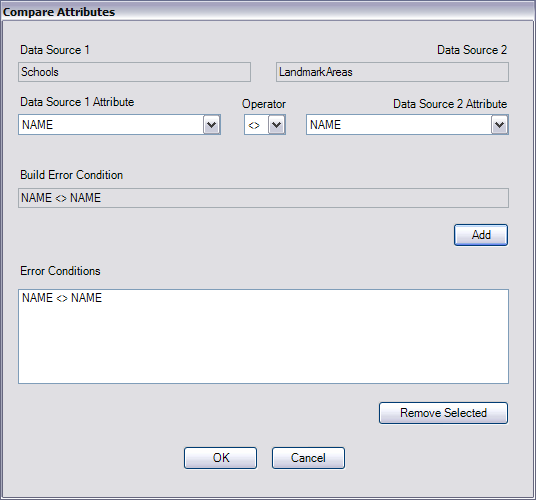
- [OK] をクリックします。
- Type a value in the Notes text box such as Point is within a Landmark Area with a different name.
- Click the Severity drop-down arrow and change the value to 3.
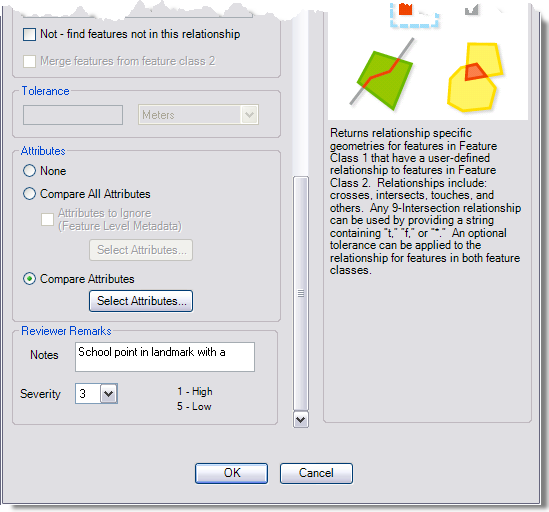
- Click OK.
The Point in landmark with different name node is added to the tree.
- Optionally, steps 12 through 27 can be repeated for all the point layers in the map (Cemeteries, GolfCourses, Buildings, and Hospitals). When repeating step 14, replace Schools with the appropriate point layer.
Exercise 2b: Duplicating a check
When creating multiple checks with similar properties, the Batch Job Manager allows you to duplicate the parameters of the check and assign different feature classes. For this portion of the exercise, you'll validate the attributes of a feature with the Execute SQL check and duplicate the check for other feature classes.
- Right-click in the empty space in the upper box of the Reviewer Batch Job Manager dialog box and click New Group.
A node called Group 2 is added to the tree.
- Select the Group 2 node and press the F2 key.
- Type Attribute Checks to rename the node.
- Right-click the Attribute Checks node and click Add Check > Table Checks > Execute SQL Check.
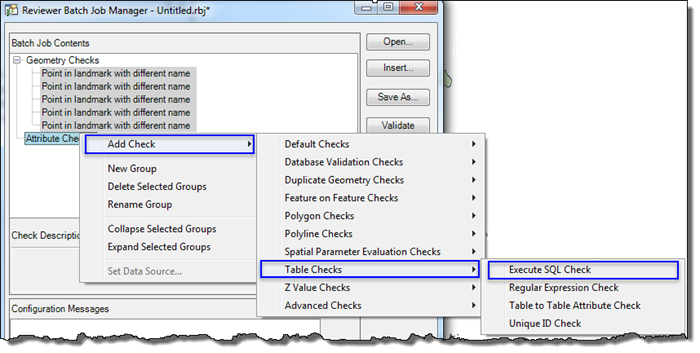
The Execute SQL Check Properties dialog box appears.
- Type Name is not populated in the Check Title text box.
- Click the Feature Class/Subtype drop-down arrow and choose MajorRoads.
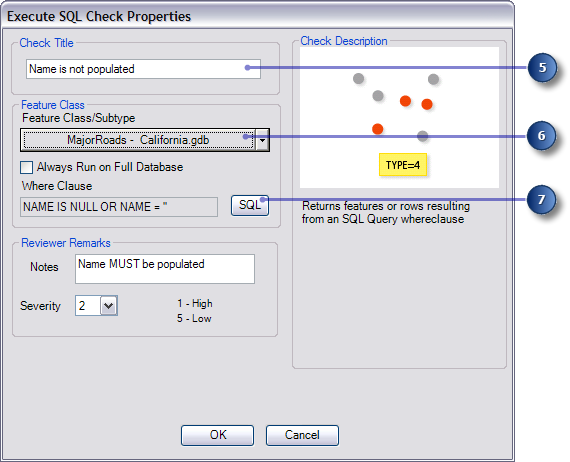
- Click SQL next to the Where Clause field.
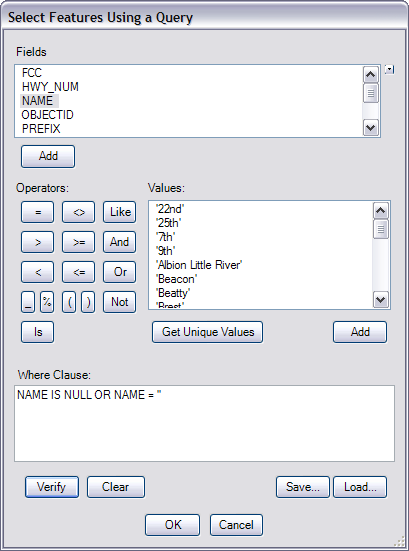
The Select Features Using a Query dialog box appears.
- Configure the query by doing the following:
- Click NAME in the Fields list, then click Add.
- Type IS NULL in the Where Clause text box.
- Click Or in the Operators area.
- Click NAME in the Fields list, then click Add.
- Click the = button in the Operators area.
- In the Where Clause text box, type ''.
This is an open single quote mark and a closed single quote mark.
When finished, the Where Clause text box should look like the following:
- [OK] をクリックします。
- Type a value in the Notes text box such as Name MUST be populated.
- If necessary, click the Severity drop-down arrow and change the value.
- Click OK.
The Name is not populated node is added to the tree.
- Right-click the Name is not populated node and click Duplicate Check.
The Duplicate Check Generator dialog box appears.
- Check the check boxes next to the feature classes or tables for which you want to duplicate the check.
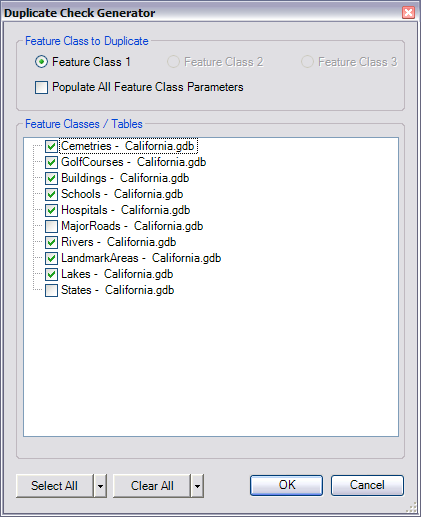
- Click OK.
A new group named Output of Duplicate is added to the tree. A Name is not populated node is added as a child to the Output of Duplicate node for each feature class that was chosen on the Duplicate Check Generator dialog box.
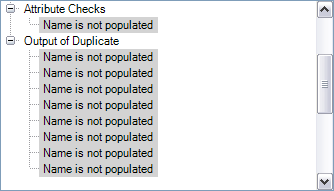
- In the tree, while pressing and holding the Shift key, select all the checks under the Output of Duplicate node.
- Click and drag the checks so they appear under the Attribute Checks node.
- Right-click the Output of Duplicate node and click Delete Selected Groups.
- When the Delete Selected Groups message appears, click Yes.
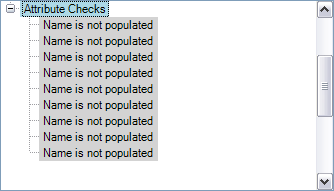
Exercise 2c: Saving the batch job
Once you are finished adding all the checks to the batch job, it can be saved and distributed. When the batch job is saved, it is stored as a Reviewer batch job (.rbj) file.
- Click Save As on the Reviewer Batch Job Manager dialog box.
The Save As dialog box appears.
- Browse to the Data Reviewer directory located in the directory where the ArcGIS Desktop tutorial data was installed and type a name for the batch job such as Reviewer.rbj.
The name you provide for your batch job will have an asterisk after .rbj until it is saved.
- Click Save.
The Reviewer Batch Job Manager dialog box appears.
- Click OK on the Reviewer Batch Job Manager dialog box to close it.
Exercise 2d: Running the batch job with Reviewer Batch Validate
One way to validate your data against the checks configured in your batch job is to run Reviewer Batch Validate. Reviewer Batch Validate allows you to choose which checks from the batch job will be run, as well as the features you want to run the checks on (Selection Set, Current Extent, Definition Query, Full Database, or Changed Features if you are using enterprise data).
- Ensure that the extent of the map is zoomed to the Batch Validate Extent bookmark by clicking Bookmarks > Batch Validate Extent on the Main Menu toolbar.
- Click the Reviewer Batch Validate button
 on the Data Reviewer toolbar.
The Batch Validate dialog box appears.
- Click Add from File.
The Select Batch Job File dialog box appears.
- Browse to and choose the .rbj file you created in Saving the batch job and click Open.
The Batch Jobs area is populated with checks from the batch job.
- Uncheck the check box next to the Attribute Checks node.
These checks are not selected to run.
- Ensure that the Current Extent option is chosen in the Features to Validate area.
- Click Validate All.
The configuration of the batch job is validated to ensure there are no errors.
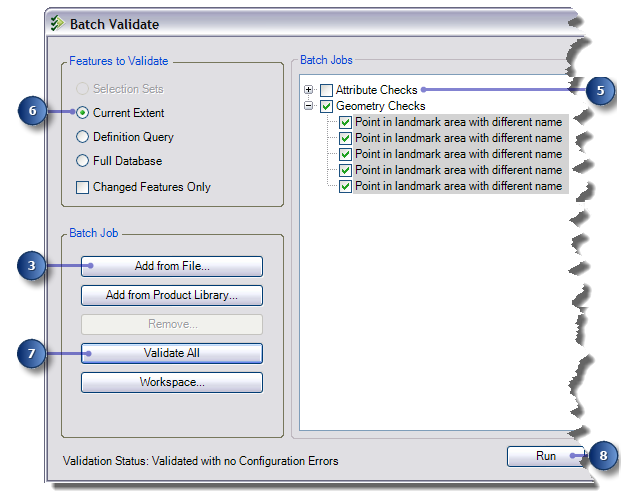
- Click Run.
The selected checks will be run on the data in the current extent. A progress dialog box appears, and when the checks are finished running, a Table Writer message appears indicating how many errors have been found.
- [OK] をクリックします。
- Click the Reviewer Table button
 on the Data Reviewer toolbar.
The Reviewer Table window appears. Ensure that the Reviewer table is docked at the bottom of ArcMap and adjust the height so you can see some of the records.
- Double-click a record.
The feature associated with the record is selected, and the extent is panned to the extent of the point feature. To see that this feature is in error, use the Identify tool on the Tools toolbar to view the attributes of the point. The name field of the LandmarkArea features is used as the label so you can see that the names do not match.
- Scroll the Reviewer table to see the values for the record.
The ObjectId of the feature appears in the ID field, and the name of the feature class appears in the Source field. Also notice that the session user name appears in the Created By field.
- Click the Reviewer Session Manager button
 on the Data Reviewer toolbar.
The Reviewer Session Manager dialog box appears.
- Click End Session.
The Reviewer session ends, and the button name changes to Start Session.
- Click Close.
The Reviewer Session Manager dialog box closes.
In this exercise, you created a batch job by configuring and duplicating checks, then ran the batch job and recorded the results in the Reviewer table. In Exercise 3, you'll learn more about running batch jobs as scheduled tasks.