This topic applies to ArcGIS for Desktop Standard and ArcGIS for Desktop Advanced only.
This workflow describes the steps for loading parcel polygons to a parcel fabric enabled with the Local Government Information Model. Parcel polygon data most commonly exists in the form of shapefiles, feature classes or CAD files.
When preparing data for loading to a parcel fabric enabled with the Local Government Information Model, it is recommended that data be formatted and then loaded into a staging geodatabase. In the staging geodatabase, parcel data is separated by type and topologies are created for each parcel type. Topologies are loaded into the parcel fabric from the staging geodatabase using the Load A Topology To A Parcel Fabric geoprocessing tool.
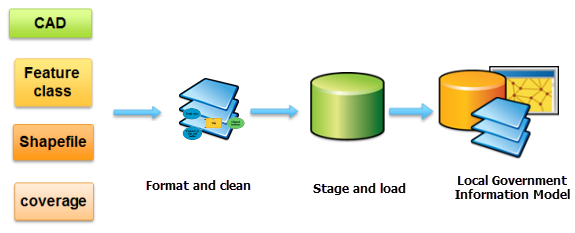
Convert CAD files and shapefiles to feature classes
If your parcel polygons exist in the form of CAD files, load your CAD files into a geodatabase polygon feature class. If your parcel polygons exist in the form of shapefiles, convert the shapefiles to a geodatabase polygon feature classes using the Feature Class To Feature Class geoprocessing tool under System Toolboxes > Conversion Tools > To Geodatabase in the Catalog window.
Enforce coincidence between boundaries
Overlaps and gaps between adjacent parcel polygons will result in a large number of topology errors. Furthermore, if you maintain overlapping parcel polygons, such as subdivisions, tax parcels, and lots, you also need to ensure that overlapping polygon boundaries are coincident. Use the Integrate geoprocessing tool under System Toolboxes > Data Management Tools > Feature Class on the Catalog window to make overlapping polygon boundaries coincident it they fall within a specified tolerance. Using the Integrate tool minimizes the number of topology errors from the Must Be Covered By Boundary Of, Boundary Must Be Covered By and Must Not Intersect Or Touch Interior rules.
Convert polygons to lines
To load parcel data to a parcel fabric, a clean topology of parcel polygons and parcel lines is required. Create lines from your polygons using the Polygon To Line geoprocessing tool under System Toolboxes > Data Management Tools > Features > Polygon To Line in the Catalog window. Make sure to choose Identify and store polygon neighboring information on the Polygon To Line dialog box to ensure that duplicate lines are not created for neighboring polygons sharing a common boundary. COGO dimensions are generated from the line shape geometry during the migration process.
Check and repair geometries
Check the geometries of the lines created from your polygons using the Check Geometry geoprocessing tool located under System Toolboxes > Data Management Tools > Features in the Catalog window. The tool generates a list of lines with bad geometries. Depending on the quality of your polygons, lines may be created that have errors, such as self-intersecting lines, null geometries, or duplicate vertices. Geometry errors should be repaired prior to loading. Run the Repair Geometry geoprocessing tool located under System Toolboxes > Data Management Tools > Features to repair bad line geometries.
It may be necessary to rebuild polygons from the lines after repairing bad line geometries to avoid topology errors between the polygons and lines in the data loading process. If you need to do this, use the Feature To Polygon geoprocessing tool located under System Toolboxes > Data Management Tools > Features to build polygons from lines. Attributes from the original polygons will need to be transferred to the newly built polygons.
Split polylines and check curves
Parcel lines must be two-point lines or curves representing a single boundary. When lines are created from polygons, polylines are generated that contain segments representing straight lines and curves. For example, a curve could be made up of some densely or sparsely populated line segments. Use the Curves And Lines Add-In to identify and split curves and straight lines from polylines (multisegmented lines).
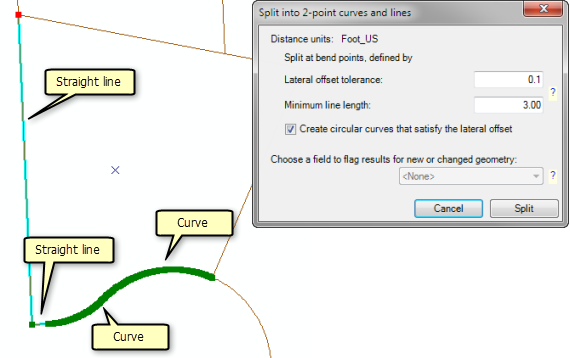
When generating curves, the add-in groups a series of segments into a single curve if the bend between each segment is less than the specified Lateral offset tolerance. Choose Create circular curves that satisfy the lateral offset to create a curved line from the series of segments. Segments are split into individual lines if the bend between line segments is greater than the lateral offset tolerance and segments are longer than the specified Minimum line length. You may need to adjust and test your tolerances until you identify tolerance values that work best for your data.
In some cases, a polyline represents a natural boundary such as a river. In these cases, you do not want to split the polyline up into individual segments prior to migration. These polylines can be migrated as natural boundaries or as line strings to the parcel fabric. You can control whether or not a polyline is migrated as a natural boundary by modifying the Minimum Line String Segment Count tolerance on the Load a Topology to a Parcel Fabric dialog box of the Load A Topology To A Parcel Fabric tool . For example, if you specify a tolerance of 20, polylines with more than 20 segments will be migrated as line strings. Polylines with less than 20 segments will be split into individual parcel lines.
Load data to the staging geodatabase
When loading source parcel data to a parcel fabric enabled with the Local Government Information Model, it is recommended that data be prepared and formatted, prior to migration, in a staging geodatabase. In the staging geodatabase, source parcel data is typed using the model types and attribute domains are applied. Parcels types are loaded into separate feature datasets for each type. Topologies for each feature dataset type are validated and loaded into the parcel fabric.
Depending on the parcel types you maintain, you might need to load parcel data into all or some of the staging feature datasets.
Download and unpack the staging layer package
The Tax Parcel Editing Map on the Land Records resource center contains a schema-only layer package file that you can use as a staging environment in your staging geodatabase. Your staging geodatabase should not be the same geodatabase as your production geodatabase that holds the target parcel fabric enabled with the Local Government Information Model.
To download and unpack the staging layer package, follow these steps:
- Create your empty staging geodatabase.
- Download the Tax Parcel Editing Map from the land records resource center and unzip the downloaded contents.
- In the Catalog window in ArcMap, navigate to the \Application\Migration Tools folder, right-click the layer package, and click Unpack.
- On the Import Schema Package dialog box, navigate to and add the location of your staging geodatabase.
- Click the Show Details arrow, choose the Other option under Spatial Reference, and specify the spatial reference of your parcel data. Click OK to unpack the layer package.
Once the layer package has been unpacked, staging feature datasets for each parcel type are created in your staging geodatabase and are added to the map. Make sure to save the map document.
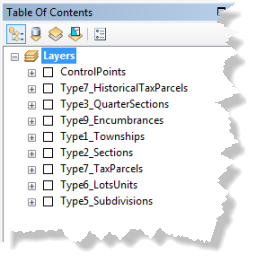
Staging feature datasets
Type your parcel polygons
Before loading your source parcel data into the staging feature classes, you need to type your parcel polygons using the Local Government Information Model lrParcelType domain. Parcel types are stored in the Parcel Type (Alias: Parcel Type, Name: Type) field on the parcel fabric Parcels table. If you have additional subtypes for your parcel types, you need to recalculate your subtypes to match the attribute domains used for the different parcel types in the Local Government Information Model. If you do not have additional subtypes on your parcel types, you still need to apply any attribute domains used for the parcel type after loading to the staging feature classes. For example, your lot and unit parcels (if you have them) should be set to or recalculated to type 6 (Lots and Units). Then you need to set the subtype of the lot using the SimConDivType field (alias of Lot or Unit Type), which uses the lrSimConDivType attribute domain.
Type your parcel lines
Your parcel lines need to be typed to be loaded with their related polygons into the staging feature classes. Parcel lines are typed with the same types as their related polygons. Parcel line types are stored in the Parcel Type (Alias: Parcel Type, Name: Type) on the parcel fabric Lines table. To add types to your lines, create a Type field on your lines feature class and follow these steps:
- Use the Select By Attributes command under the Selection menu to select polygons of a specific type.
- Use the Select By Location command under the Selection menu to select the lines that lie under the selected polygons.
On the Select By Location dialog box, make sure to check Use selected features under the Source layer dropdown list.
- Once you have selected your lines, open the lines attribute table and use the Field Calculator on the Type field to populate the selected lines with the appropriate parcel type.
- Repeat the above steps for all your parcel polygon types.
Load parcel data into the staging feature datasets
Each staging feature dataset contains a parcel polygon feature class, a parcel line feature class, and a topology. The topology contains both feature classes in the feature dataset and also has the required topology rules for data migration using the Load A Topology To A Parcel Fabric geoprocessing tool. In the map, the topology is symbolized to display topology rule errors.
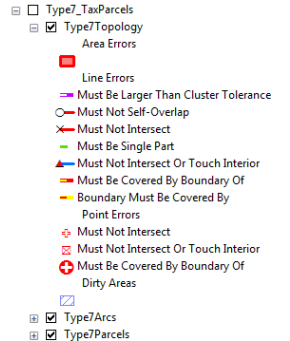
Attributes and domains that reflect the editing requirements of Local Government parcel maintenance are added to both the parcel polygon and parcel line staging feature classes. These attributes mirror the attributes that are added to the parcel fabric when it is enabled with the Local Government Information Model. The Type5_Subdivisions, Type6_LotsUnits, Type9_Encumbrances, and Type7_HistoricTaxParcels polygon feature classes are symbolized using attribute domains in the map.
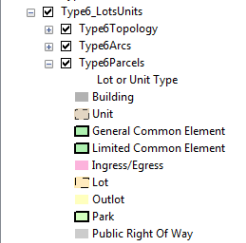
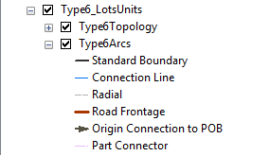
The parcel line feature class is symbolized to display lines by line category. The line category used is the same category used by parcel fabric lines.
Polygon types (and their corresponding lines) are queried and loaded into the separate staging feature classes representing each parcel type.
Load parcel polygons
Follow these steps to load parcel polygon types into the staging feature classes in the staging feature datasets:
- In the Catalog window in ArcMap, right-click the polygon staging feature class to which you want to load data and click Load > Load Data.
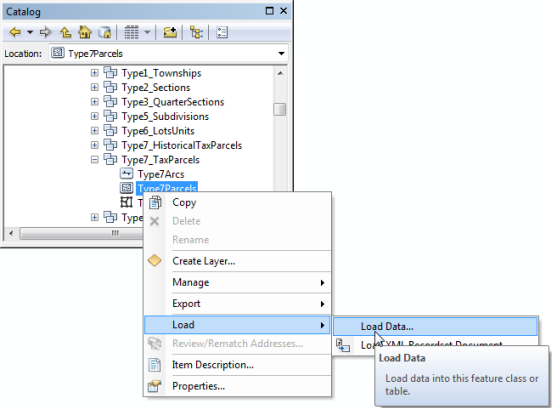
Loading data to a feature class - Click Next on the Simple Data Loader dialog box to begin using the simple data loader wizard.
- Navigate to your source parcel polygon feature class and add it to the List of source data to load. Click Next.
- Make sure that I do not want to load all features into a subtype is chosen and click Next.
- In the next step of the wizard, map the fields of your parcel polygon feature class to the fields in the staging feature class. Click Next.
Different fields will be available depending on which parcel types you are loading. For example, if you chose to load polygons to the Type6Parcels feature class (lots or units), the SimConDivType field (alias of Lot or Unit Type) is available. If you maintain subtypes for your lot parcels, you need to have recalculated the subtype values to match the values of the SimConDivType domain on the SimConDivType field (alias of Lot or Unit Type). If you do not maintain subtypes for your parcel types, you still need to calculate attribute domains for parcels on the SimConDivType field (alias of Lot or Unit Type) after loading.
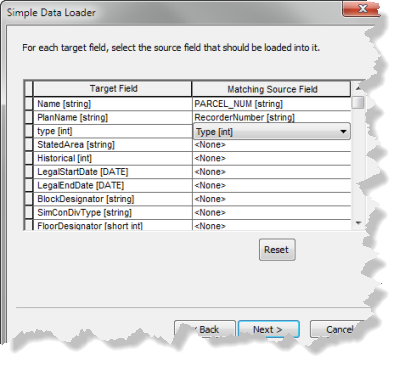
Field mapping - In the next step of the wizard, choose Load only the features that satisfy a query and click Query Builder to build a query to load parcels of a specified type. Click Next once you have added your query.
For example, if you are loading parcels into the Type7Parcels feature class, you will build a query to select parcels of type 7.
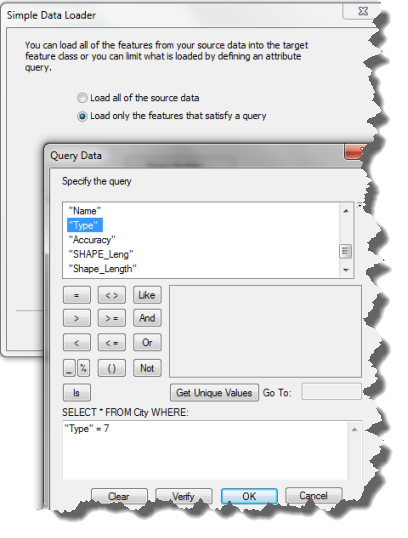
Query for parcels of type 7 - Click Finish on the summary page of the wizard to begin loading parcels.
Load parcel lines
Follow the steps listed above to load your related parcel lines into the appropriate Arcs staging feature classes.
ArcGIS Data Reviewer
Once you have staged and formatted your source parcel data, you can use ArcGIS Data Reviewer to validate your data for loading into the parcel fabric Local Government Information model. ArcGIS Data Reviewer includes checks for validating geometries, topologies and can also perform database checks to check that the correct parcel types and domains are present. See the Evaluating Data Readiness for Loading into the Parcel Fabric and the Evaluating Data Readiness for Loading into the Parcel Fabric (Continued...) blogs for more information on using ArcGIS Data Reviewer for data validation and the parcel fabric.
Validate topologies
Once your source parcel data is typed and loaded into the staging feature datasets, topologies in the feature datasets need to be validated against the required set of topology rules. The topology rules have already been added to the topologies in the staging feature datasets.
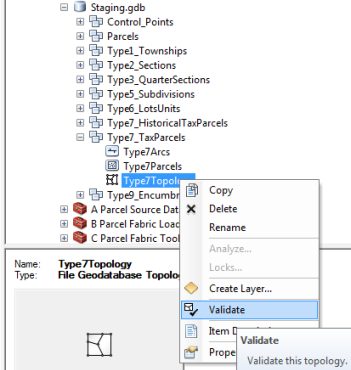
After validating topologies, any topology errors need to be fixed before the topology can be migrated to the parcel fabric.
Learn more about minimizing topology errors in the parcel fabric data migration process
Migrate topologies to the parcel fabric
Use the Load A Topology To a Parcel Fabric geoprocessing tool located under System Toolboxes > Parcel Fabric Tools > Data Migration in the Catalog window to migrate your clean, validated topologies to a parcel fabric enabled with the Local Government Information Model. Your parcel fabric should exist in a separate, production geodatabase and not the staging geodatabase.
See Data loading considerations for more information on loading attribute fields, plans and dealing with overlapping polygons.